Table of Contents
Key Takeaways
- A rustic farmhouse reclaimed wood sideboard is a substantial build — more demanding than a shelf or table top — but produces a piece of furniture with a presence and quality that no mass-produced alternative comes close to matching.
- Carcass construction is the foundation of the entire piece; getting it square, solid, and properly jointed determines whether the doors and drawers work correctly for the life of the sideboard.
- Timber selection for a sideboard needs to account for both the visible faces and the structural requirements of the carcass — these do not always call for the same material.
- Door and drawer design is where the build gets interesting; the combination of reclaimed timber panels and simple, well-made hardware can produce results that look genuinely antique.
- A farmhouse aesthetic does not mean rough or careless — it means honest, proportionate, and built to last. The difference between rustic and shoddy is craftsmanship.
- Finishing a sideboard correctly requires patience; the visible external surfaces need more care than any other part of the build, because they will be looked at directly every day.
The Piece the Dining Room Had Been Waiting For
Some furniture projects start with a clear brief. This one started with a wall. The dining room wall opposite the window — long, unbroken, at exactly the right height to carry a substantial piece of low furniture — had been waiting for something since we moved in. We had tried a painted chest of drawers that was too narrow. We had tried a console table that was too shallow to be useful. We had tried nothing, which was the most honest assessment of what we actually had.
What the wall needed was a proper sideboard. Low, long, solid, with storage that worked and a surface that could carry the things a dining room sideboard is supposed to carry — serving dishes, candles, the occasional bottle of wine that gets left out because another one was opened before the first was finished.
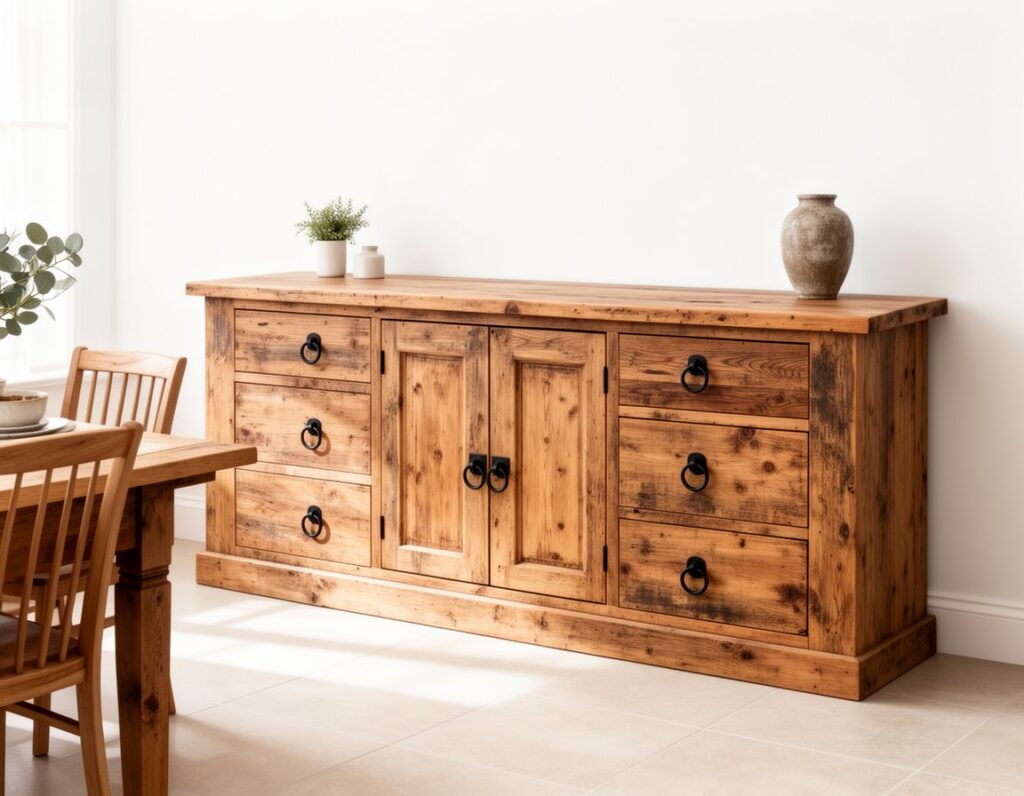
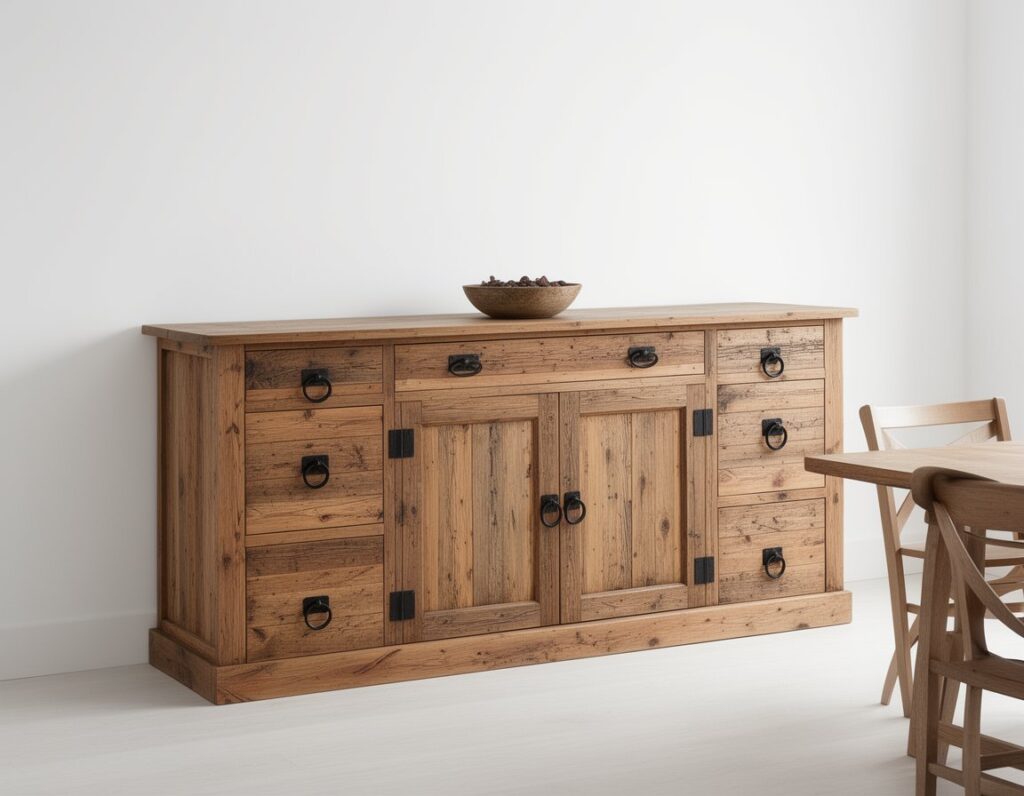
The aesthetic we had in mind was rustic farmhouse: chunky, honest, built from timber that looked as though it had a history. A reclaimed wood sideboard, made from salvaged oak and pine, with simple hardware and a surface finish that enhanced the character of the material rather than obscuring it.
This is how we built it.
Designing the Sideboard
Dimensions
Our sideboard is 175cm wide, 45cm deep, and 85cm tall — a height that makes it comfortable to use as a serving surface when standing, and proportionate to the wall it sits against. These are not arbitrary figures; we measured the wall, measured the space below the window, checked the height against our own reach and the scale of the room, and worked backwards to a design that suited all three.
Width is the most room-specific dimension. A sideboard that is too narrow for its wall looks lost; one that is too wide looks squeezed. As a rough guide, the sideboard should occupy 60–75% of the wall it sits against, leaving breathing room at each end.
Depth matters for practical reasons. Forty-five centimetres allows a serving dish to sit on the surface without hanging over the front edge. Less than 38cm begins to feel mean for a sideboard intended for dining room use. More than 50cm starts to intrude into the circulation space of a standard dining room.
Height at 85cm places the surface at a comfortable serving height — slightly higher than a standard kitchen worktop — and leaves the piece visually proportionate without looking squat or spindly.
Internal Layout
We designed the interior as three equal bays, each approximately 56cm wide. The central bay is open behind two doors — useful for larger items such as serving dishes, table linens, and wine. The two outer bays each contain two drawers stacked vertically, giving four drawers in total for cutlery, candles, tablecloths, and the miscellaneous objects that accumulate in a dining room without a proper home.
A fixed central shelf inside the door section, set at mid-height, divides the storage into upper and lower compartments. A simple back panel closes the interior.
The Farmhouse Aesthetic
Rustic farmhouse as a furniture style is frequently misunderstood. It does not mean rough, unfinished, or thrown together from whatever was available. It means honest materials — timber that shows its grain and its history — combined with proportions that are generous rather than fussy, hardware that is functional rather than decorative, and a finish that works with the character of the timber rather than against it.
For a sideboard, this translates into: visible grain and surface character on external faces, no veneer or composite materials, simple but well-made drawer and door details, and hardware — handles, hinges, catches — that is robust and period-appropriate without being costume-drama theatrical.
Sourcing the Timber
A sideboard requires more timber than any of the single-surface pieces we have described in previous projects, and it requires it in two distinct categories: structural timber for the carcass, and character timber for the visible external faces.
Carcass Timber
The carcass — the internal framework of the piece — needs to be dimensionally stable, structurally sound, and capable of taking fixings reliably. It does not need to be visually spectacular, because most of it will never be seen. Reclaimed pine in good condition is our preferred carcass material: it is affordable, machines well, takes screws securely, and is stable enough for indoor furniture once properly dried.
We sourced the carcass timber from old floorboards — Victorian softwood in 32mm thickness, well-dried and straight, from a batch at our local reclamation yard. Enough for the top, bottom, sides, central dividers, and fixed shelf of the carcass, plus the back panel.
Face Timber
The external faces of the sideboard — the top, the front face of the drawer fronts, the door panels, and the visible ends — are where the character timber earns its place. We used reclaimed oak for the top and the end panels, and a combination of reclaimed pine and oak for the drawer fronts and door panels, which gave a slightly varied but coherent look that suited the farmhouse brief perfectly.
The oak came from the same yard as the carcass timber — a different stack, wider boards in 28mm thickness with a grain and colour that contrasted pleasingly with the pine. We selected boards for the top with particular care, spending time in the yard laying out different combinations to find an arrangement that worked across the full 175cm width.
Hardware
We sourced the hardware — door hinges, drawer pulls, and magnetic catches — from a specialist period hardware supplier. We used heavy cast iron ring pulls for the drawers and cup pulls for the doors, with black japanned butterfly hinges for the door hanging. Robust, period-appropriate, and visually at home with reclaimed timber.
The Build Process
Step One: Timber Preparation
All timber — carcass pine and face oak — went through the standard preparation process. Magnet sweep, nail removal, moisture content check. The pine carcass timber read at 9–11%, the oak face boards at 10–12%. Both were within acceptable range after two weeks of acclimatisation in the room.
Carcass pine was thicknessed to a consistent 28mm. Oak face boards were thicknessed to 24mm for the door and drawer fronts, and 32mm for the top and end panels — the additional thickness on the top gives the sideboard a sense of solidity at the most visible horizontal surface.
Step Two: Building the Carcass
The carcass was built first, in pine, using a combination of pocket screw joinery and PVA glue throughout. Pocket screws are not the most traditional joinery method, but they are fast, reliable, and produce joints of adequate strength for a carcass of this type. More traditional alternatives — mortice and tenon, biscuit joints, or housing joints — are entirely appropriate if the builder has the tools and the experience.
Top and Bottom Panels
The top and bottom panels of the carcass — each a width of three jointed pine boards — were glued and biscuited, clamped, and left to cure overnight before any further work. These panels form the primary horizontal structure of the piece and need to be flat and square before the carcass assembly begins.
Side Panels and Dividers
The two side panels and the central vertical divider were cut to the same height — the internal height of the carcass — and the housing joints for the fixed shelf were routed into the side panels and divider before assembly. A housing joint — a channel routed across the full width of the panel — receives the end of the shelf and supports it along its full depth, which is significantly stronger than a shelf pin or a simple screw fixing.
Assembly
Carcass assembly is a two-person job on a piece of this size. The bottom panel was laid flat, the side panels attached at each end using pocket screws driven from inside the carcass, and the central divider positioned and fixed at the midpoint. The fixed shelf was glued and slid into its housing joints on both the side panels and the divider. The top panel was fixed last, again from inside, pulling the whole assembly square.
We checked for square by measuring the diagonals of the carcass — both diagonals should be equal if the assembly is square. A slight rack was corrected by applying pressure to the longer diagonal while the glue cured. Clamps are your friend at this stage.
Back Panel
The back panel — reclaimed pine boards in tongue-and-groove configuration, run vertically — was nailed into a rebate routed around the inner rear face of the carcass. A back panel does more than close the interior; it locks the carcass square and provides significant resistance to racking. Do not omit it or treat it as an afterthought.
Step Three: Legs and Base
The farmhouse aesthetic calls for legs that are substantial enough to look purposeful under a heavy carcass. We used four sections of reclaimed oak post — 70mm by 70mm in section — cut to 120mm in length. These give the sideboard a modest but clearly visible lift off the floor, which lightens the visual mass of the piece and makes cleaning beneath it practical.
The legs were fixed to the underside of the carcass bottom panel using heavy-duty table leg mounting plates — a simple and extremely reliable fixing method that also allows the legs to be removed if the piece ever needs to be transported. A fifth central leg at the front was added under the central divider position to prevent any flex in the bottom panel under load.
Step Four: Drawers
The four drawers were built using a simple box construction — pine sides, back, and bottom, with reclaimed oak fronts applied as a face on the finished box. This is standard furniture-making practice: the structural box can be made from secondary timber while the visible front is in the character material.
Drawer sides and backs were cut from 16mm pine, assembled with glue and nails into a simple rectangular box, and the drawer bottom — 6mm plywood — was fitted into a groove cut along the inside of all four sides. The drawer boxes were fitted to the carcass using undermount drawer runners — simple, reliable, and completely invisible once the drawers are closed.
The oak drawer fronts were cut to size — each slightly overlapping the carcass opening on all four sides to give a consistent reveal around the perimeter — and drilled for the cast iron ring pulls. They were fixed to the drawer boxes from inside, through the front face of the box into the back of the oak front, using adjustable screws that allow the front to be positioned precisely before final tightening.
Getting drawer fronts to align evenly is one of the more satisfying and occasionally maddening stages of any cabinet build. We used double-sided tape to hold each front in its intended position while the drawer was closed and the position assessed from the front — adjusting millimetre by millimetre until the reveals were consistent across all four drawers — before drilling and fixing.
Step Five: Doors
The two doors were each made as a simple frame-and-panel construction — a reclaimed pine outer frame with a reclaimed oak panel floating in a groove routed around the inside of the frame. A floating panel — one that sits in a groove rather than being glued in place — is free to expand and contract seasonally without causing the door to rack or split. This is fundamental furniture-making practice and not a detail to skip on a door of any significant width.
The frame joints were morticed and tenoned — a slightly more demanding joint than a biscuit, but appropriate for a door that will be opened and closed thousands of times and needs the joint to remain tight under repeated movement. The panels were lightly sanded to 180 grit and finished before being fitted into the frames — finishing a panel in a completed door is significantly more difficult than finishing it before assembly.
The doors were hung on black japanned butterfly hinges — two per door, morticed flush into the door edge and the carcass face. Getting hinges morticed correctly requires care: a hinge that is not perfectly flush creates a door that does not sit flat when closed. We used a sharp chisel and a marking gauge to cut the hinge recesses, checking the depth with the hinge itself before the final cut in each case.
Magnetic catches — recessed into the carcass top and engaging with a strike plate on the inside of the door — hold the doors closed without the need for a knob or catch on the inside.
Step Six: The Top
The top — jointed oak boards in 32mm thickness, prepared and glued in the same way as a table top — was fixed to the carcass using wooden buttons routed into a groove around the inside of the carcass top edge. Wooden buttons allow the top to expand and contract seasonally across its width without the fixings resisting the movement. On a wide solid timber top, this detail is not optional — a rigidly fixed oak top will develop cracks at the joints as the timber moves seasonally.
The top overhangs the carcass by 30mm at the front and each end, and sits flush at the back. The overhang creates a shadow line that lifts the visual quality of the piece considerably — a top that sits flush with the carcass looks like a lid, while a top that overhangs looks like considered furniture.
Step Seven: Finishing
External surfaces were sanded progressively through 80, 120, and 180 grit. The oak top and end panels received a final pass by hand with 180 grit along the grain before finishing. The pine drawer fronts and door frames were treated identically to the oak — same grit sequence, same hand finish.
We used Osmo Polyx-Oil in a satin finish throughout — applied in two coats on the interior surfaces and three coats on the external visible faces. The oak responded with the deep, warm colour shift that hardwax oil on old oak always produces: amber tones deepening, grain sharpening, surface character becoming more rather than less defined with each coat.
The cast iron hardware was fitted last, once the finish had fully cured. The ring pulls, butterfly hinges, and cup handles were left in their natural black japanned finish — no polishing, no treatment, because the slightly uneven, period quality of the hardware is exactly what suits the farmhouse aesthetic of the piece.
The Finished Sideboard
The sideboard has been in the dining room for just over a year. It carries the wine glasses, the candles, the spare napkins, and the general pleasant accumulation of objects that a dining room sideboard is supposed to manage. The drawers open smoothly. The doors sit flat and close cleanly. The top has acquired a mark or two from glasses, a slight deepening of colour where the light from the window falls across it in the afternoon.
It is exactly what the wall had been waiting for. Not because it is perfect — it is not, and we know where every compromise and correction is hidden in the construction. But because it is right for the room, right for the use, and right for the material. A reclaimed wood sideboard built with that intention always ends up looking like it belongs.

Frequently Asked Questions
How long does it take to build a reclaimed wood sideboard?
A sideboard of the scale described in this article is a project of three to four full weekends for a competent DIYer with the right tools, plus preparation and drying time before the build begins. The carcass typically takes one full weekend to build and fit. The drawers and doors together account for another full weekend. Finishing — with drying time between coats — adds a further week of evenings. Timber sourcing and acclimatisation adds two to four weeks before any construction begins. The total elapsed time from decision to finished piece is typically six to eight weeks, though much of that is waiting rather than working.
Do I need a workshop to build a reclaimed wood sideboard?
Not necessarily, but the project benefits enormously from a space where the carcass can be assembled flat and square and left undisturbed while glue cures. A garage, a workshop, or a large utility room with flat floor space is ideal. The individual components — panels, drawer boxes, door frames — can be made in a more modest space and brought together for assembly in a larger one. The key tools are a thicknesser or access to one, a table saw or circular saw, a router, a drill, and clamps — a lot of clamps. If the tool kit is modest, many of the machining operations can be done at a local community workshop or makerspace.
What type of hinges work best for a reclaimed timber sideboard door?
For a farmhouse or rustic aesthetic, surface-mounted butterfly or H-hinges in black or dark steel are the most visually appropriate choice. They are visible when the door is open and contribute to the period character of the piece. For a cleaner look where the hinge is less visible, morticed butt hinges in the same black or japanned finish are the more traditional furniture-making choice and produce a neater result when well fitted.
Concealed European cup hinges — the standard in modern flat-pack furniture — are structurally reliable but visually incompatible with a reclaimed timber farmhouse piece. Whatever hinge type is chosen, the quality of the fitting matters more than the choice of hinge — a well-fitted inexpensive hinge outperforms a poorly fitted expensive one.
How do I stop the solid wood top from cracking over time?
Three things prevent cracking in a solid timber sideboard top: correct moisture content before construction, consistent finishing on both the top face and the underside, and fixing the top to the carcass in a way that allows seasonal movement. The timber must be at 8–12% moisture content — check with a meter before construction.
Both faces of the top must receive the same number of finish coats — leaving the underside unfinished causes differential moisture absorption that results in cupping and eventually cracking. The top must be fixed with wooden buttons or equivalent movement-allowing fixings, not glued or rigidly screwed through the carcass. Attend to all three and a jointed hardwood top will be stable for decades in a normal domestic environment.
Can I adapt the design to include more drawers and fewer doors?
Absolutely, and for many uses a sideboard with more drawer storage is more practical than one with predominantly open cabinet space. The carcass structure remains the same — the internal divisions simply change from a large open bay to a series of drawer openings. The key consideration is the minimum useful drawer height — below about 80mm internal depth, a drawer becomes impractical for most stored items. Full-height drawer stacks in all three bays, each with three drawers per bay, give nine drawers in total — generous storage with a clean, symmetrical front elevation that suits a more contemporary interpretation of the farmhouse aesthetic.
Conclusion
Building a rustic farmhouse reclaimed wood sideboard is the most ambitious project in this series, and the most rewarding. It demands more planning, more timber, more tool use, and more patience than any of the single-surface builds we have described elsewhere. In return it delivers a piece of furniture with a scale, a presence, and a quality of material that you will not find at any price point in a furniture showroom.
The farmhouse aesthetic is not a shortcut — it is a standard. Honest materials, proportionate design, and construction that is built to outlast everything else in the room. A reclaimed timber sideboard built to that standard does not date, does not deteriorate, and does not disappoint.
For everything you need to know about sourcing and preparing the timber before a project like this one — species selection, moisture content, hidden fixings, and finishing — our complete guide to reclaimed wood covers the full process from salvage yard to finished surface.