Cut yard work fast by mapping “care zones,” keeping high‑visibility beds simple, and edging once with steel or composite. Swap needy lawn for tough groundcovers (thyme, sedum, clover) or gravel over permeable fabric and a 3–4 inch base. Mulch beds about 3 inches and top off yearly. Choose native, drought‑tolerant plants that fit mature size to avoid constant pruning. Add compact gravel‑and‑paver paths and a basic drip system with a timer—next, you’ll see the easiest upgrades to prioritize.
Key Takeaways
- Divide your yard into care zones, focusing effort on high-visibility areas and keeping low-traffic corners simple.
- Install durable, straight or gently curved edging to speed mowing, reduce trimming, and keep beds looking neat.
- Replace lawn with drought-tolerant natives, groundcovers, and compact shrubs that match your climate and need minimal pruning.
- Use 3 inches of mulch or gravel in beds to suppress weeds, retain moisture, and cut watering and weeding time.
- Add simple drip irrigation with timers, grouped by plant water needs, to automate efficient watering and prevent waste.
Plan a Low‑Maintenance Landscape That Fits Your Time
If your weekends are already packed, start by designing a landscape that matches the time you can realistically give it. Map your yard into “care zones”: high‑visibility areas get the most attention, while back corners stay simple.
Reduce turf first; it’s the biggest time sink. Replace sections with mulch, gravel, or hardscape paths so you’ll mow less and weed faster. Install edging to keep materials in place and cut trimming time.
Group tasks: one drip line route, one compost spot, one tool storage area. Choose a few focal points of Garden art to add style without extra upkeep.
Add low‑work Wildlife habitats with a birdbath on a timer and a small brush pile, then schedule short, repeatable 15‑minute routines.
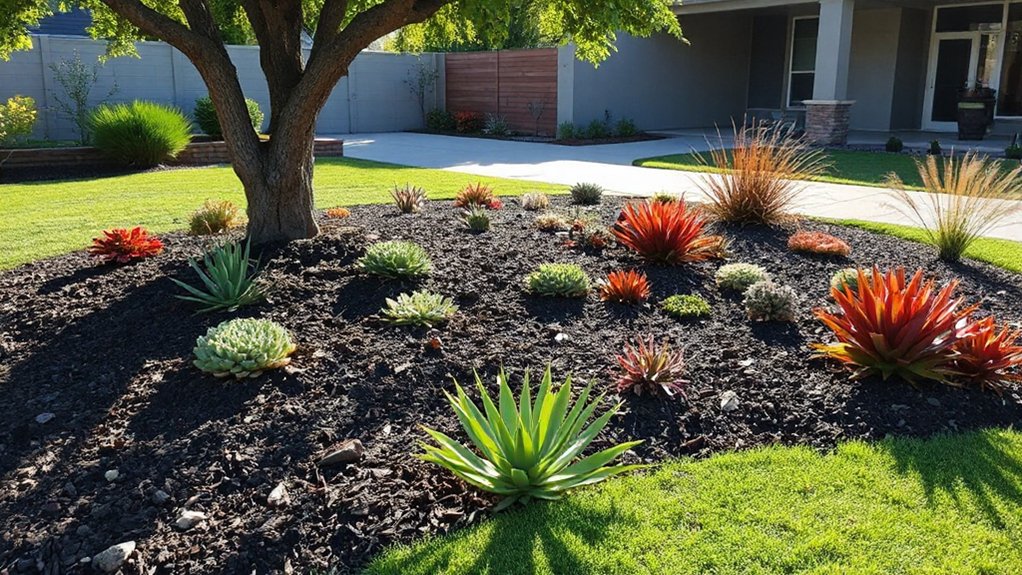
Pick Climate‑Smart Plants (Natives and Drought‑Tolerant)
You’ll save time and money when you choose native plants that already match your local soil, rainfall, and pests, so they need less watering and fewer treatments.
Build your planting list around drought‑tolerant varieties—think deep‑rooted perennials, tough ornamental grasses, and hardy shrubs—so your yard stays green with fewer irrigation cycles.
If you’re not sure what qualifies, check local extension lists or native plant society guides and buy smaller sizes to cut upfront costs.
Choose Native Plant Varieties
Because native and drought-tolerant plants already match your region’s heat, rainfall, and soil, they’ll thrive with less watering, fertilizing, and babysitting—exactly what a busy schedule needs.
Focus on native plant benefits: fewer pest problems, better survival rates, and stronger support for local pollinators, which can boost blooms without extra inputs.
Use plant selection tips that save money up front: check your local extension office or native plant society lists, then match each plant to your yard’s sun, shade, and drainage.
Buy smaller container sizes; they establish fast and cost less.
Group natives with similar light and moisture needs so you can water efficiently during establishment, then scale back as roots develop.
Prioritize Drought‑Tolerant Options
Native choices already cut down on watering and pest headaches, and you can push that low‑maintenance edge further by prioritizing drought‑tolerant plants throughout the yard. Start by mapping sun, shade, and runoff so you don’t waste money on plants that’ll struggle. Group species by water needs, then irrigate only those zones.
Follow xeriscaping principles: improve soil with compost, use 2–3 inches of mulch, and pick deep‑rooted perennials and shrubs that hold up between rains. Swap thirsty turf for drought resistant grasses or small no‑mow areas, and edge beds to keep mulch in place.
Install drip lines or soaker hoses on a timer to cut evaporation. You’ll lower your water bill, reduce replacements, and still keep curb appeal high year‑round.
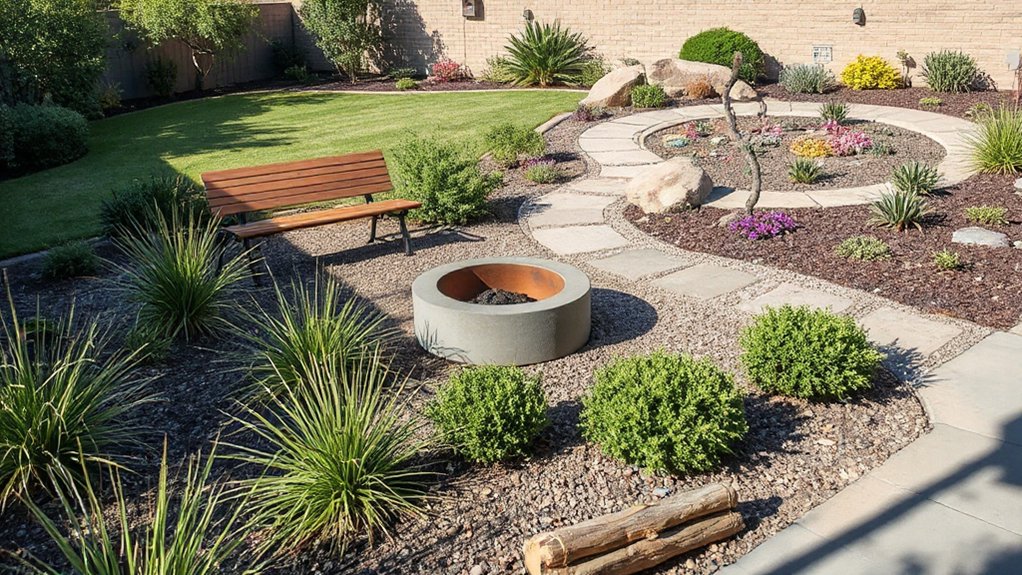
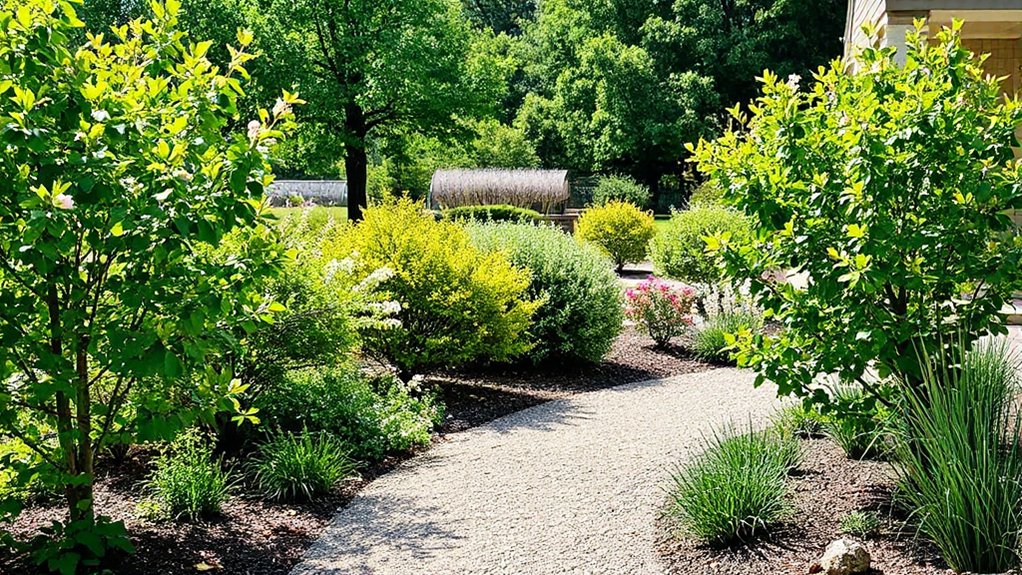
Replace Lawn With Easy Groundcovers or Gravel
If you’re tired of mowing, replace part (or all) of your lawn with tough groundcovers like creeping thyme, sedum, or clover that spread fast and need little water.
Where plants won’t thrive—along walkways, under downspouts, or in baking-hot strips—set up gravel mulch zones with landscape fabric and edging to cut weeds and reduce upkeep.
You’ll spend more upfront on materials, but you’ll save time and ongoing water and maintenance costs.
Choose Tough Groundcovers
Wondering where all your weekend hours go once the lawn starts demanding constant mowing, edging, watering, and patching? Swap high‑input turf for tough, low‑grow plants that cover soil fast and cut maintenance costs.
Start by matching groundcover varieties to conditions: sun, shade, foot traffic, and moisture. For sunny, dry spots, try creeping thyme or sedum. For shade, use sweet woodruff or ajuga. For erosion-prone slopes, choose creeping juniper or cotoneaster for better soil stabilization.
Prep once, save later: remove weeds, loosen the top 3–4 inches, mix in compost only if soil is poor, then plant in tight spacing so they knit together quickly. Water weekly until established, then taper off. Edge beds cleanly to prevent spread.
Use Gravel Mulch Zones
When mowing and watering feel like a weekly tax, carve out gravel‑mulch zones to replace high‑maintenance lawn with a clean, durable surface that stays neat with minimal upkeep. Start small: convert thin strips along fences, under downspouts, or around trees where turf struggles anyway.
Excavate 3–4 inches, lay permeable landscape fabric, then add edging to keep stones from migrating. Choose 3/8-inch pea gravel or decomposed granite for comfortable footing, and compact it for fewer ruts.
Connect areas with gravel pathways so you’re not tracking mud through the yard. Use matching mulch color in nearby beds to make the swap look intentional.
Top-dress yearly, rake leaves off, and spot-spray weeds early for best results.
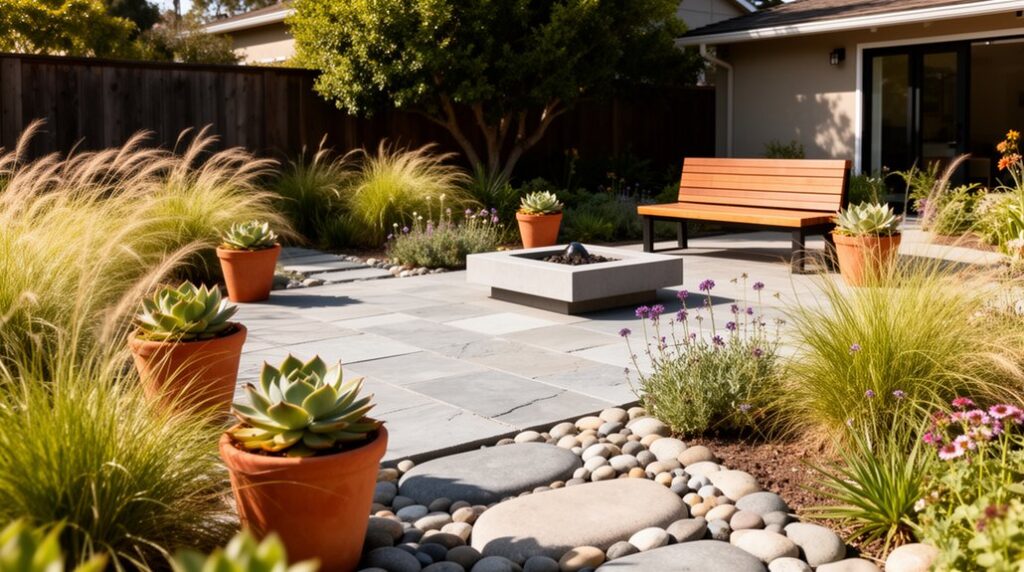
Keep Beds Neat With Simple Edging
Because crisp edges do more than look tidy, simple edging is one of the fastest, lowest-cost ways to keep your beds neat with minimal upkeep. Start by defining a clear line between lawn and bed; a half-moon edger or flat spade works, and you’ll only need touch-ups a few times a year.
For a longer-lasting border, pin down steel, aluminum, or composite edging; set the top slightly above grade so grass can’t creep over. Skip fussy curves—gentle arcs are easier to cut and mow against.
Use edging to frame focal points like garden art, and to organize seasonal planting pockets you can swap without disturbing the whole bed.
Measure runs first, buy only what you need, and install once.
Mulch Basics: Depth, Types, and Refresh Schedule
After you’ve kept beds tidy with simple edging, mulch is your next best time-saver for blocking weeds and holding moisture. You’ll get the best value by laying the right depth (too thin won’t work, too thick can smother plants) and picking a type that fits your budget and goals, from shredded bark to wood chips to compost.
Then you’ll stick to a simple refresh schedule—top off when it’s faded or thinned out, and plan a fuller re-mulch about once a year in most beds.
Ideal Mulch Depth
To stay cost-conscious, measure your bed square footage before buying: 1 cubic yard covers about 100 sq ft at 3 inches.
Maintain even mulch patterns so thin spots don’t invite weeds.
Use consistent mulch color to spot erosion quickly.
Check depth seasonally; top up only where it’s below 2 inches.
Mulch Type Comparison
While mulch bags may look interchangeable at the store, each type handles weeds, moisture, and replacement costs differently.
Shredded hardwood locks together, resists washout, and suits slopes; it’s a solid budget pick.
Bark nuggets last longer but can float in heavy rain, so you’ll spend more upfront and may chase pieces.
Pine straw goes down fast and drains well, but wind can move it unless you tuck it under shrubs.
Compost improves soil but won’t block weeds as well, so pair it with edging.
Rubber mulch doesn’t break down, yet it can heat up and looks less natural.
For mulch color options, dyed mulch offers consistent tone but may fade.
Use mulch application techniques like raking level and keeping it off stems.
Refresh Timing Guide
Since mulch doesn’t disappear overnight, you can stretch your budget by revitalizing it on a simple schedule instead of dumping new bags every season.
Keep beds at 2–3 inches deep; less won’t block weeds, more can smother roots and invite rot. In spring, rake to break crusts, pull back mulch from stems, and top-dress only where you see bare soil.
Plan a fuller refresh every 12–24 months for shredded bark, 6–12 months for fine wood chips, and 2–3 years for stone (just rinse and re-edge).
If you notice fading color, floating pieces, or thin spots, spot-fill instead of redoing everything.
For Pest control, avoid mulch piled against siding and refresh after heavy rain to reduce ants and earwigs.
Place Garden art before topping off so you don’t bury it.
Landscape Fabric: When It Helps (and When It Fails)
If you’re tempted to roll out landscape fabric to “stop weeds for good,” it pays to know exactly what it can and can’t do. Used under gravel or mulch, it can improve weed control by blocking light and separating soil from topping, so your surface stays cleaner and you rake less.
It fails when you expect permanence. Windblown dust and decomposing mulch create a new seed bed on top, and weeds root right through it. Cheap fabric tears, and aggressive weeds can puncture it.
For best results, buy woven fabric, overlap seams 6 inches, and pin every 12–18 inches. Add 2–3 inches of mulch or gravel, and edge the area so material doesn’t wash off.
Skip fabric in planting beds; roots need oxygen and you’ll hate repairs.
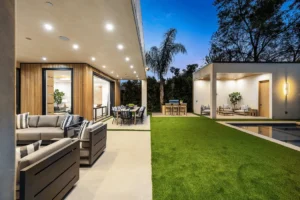
Hardscape Ideas: Patios, Paths, and Seating Areas
Weed control gets easier when you reduce the amount of exposed soil, and hardscape does that with far less upkeep than constantly revitalizing mulch. Start with a small patio you’ll actually use: compacted gravel plus pavers costs less than a full slab and drains well. Edge it with steel or concrete curbing to stop spreading and keep lines crisp.
For paths, choose wide stepping stones or paver rows set over a firm base so you won’t reset them every season. Fill joints with Decorative stone to discourage weeds and reduce muddy footprints.
Add a simple seating pad near the door so you’ll sit outside more often; a pea-gravel square with border edging works. If you want Water features, pick a self-contained bubbling urn on a paved pad to limit splash and mess.
Drip Irrigation Made Simple (Zones, Timers, Emitters)
Where does your irrigation time really go—dragging hoses, guessing how long to run a sprinkler, and still missing the thirsty spots? A drip setup fixes that with targeted watering and less waste.
Start with zone optimization: group plants by sun and water needs, and keep each zone under your water pressure limit. Use a simple battery or Wi‑Fi timer, set early-morning runs, and adjust seasonally instead of watering “just in case.”
Choose 1/2-inch mainline with 1/4-inch tubing, then match emitters to the job: 0.5–1 GPH for containers, 2 GPH for larger plants, and dripline for beds.
For drip system maintenance, add a filter, flush the line monthly, and replace clogged emitters—cheap, fast fixes.
Choose Easy Trees and Shrubs That Don’t Overgrow
Because nonstop pruning eats weekends and money, you’ll save the most time by choosing trees and shrubs that stay close to their mature size for the space. Read plant tags for height and spread at maturity, then leave at least 30–50% extra room so branches don’t crowd siding, paths, or power lines.
Pick slow-growing, compact cultivars and naturally tidy forms so you won’t rely on Tree pruning to “fix” scale problems later.
For hedges, choose varieties bred for short height and dense growth, and space them correctly so they fill in without constant shearing.
Plan access for mulch and drip lines, and keep shrubs off irrigation heads.
You’ll cut shrub trimming to a quick once-a-year touch-up, not a monthly chore.
Common “Low‑Maintenance” Mistakes That Add Work
Even if a plant or feature claims “low‑maintenance,” a few common setup mistakes can quietly lock you into extra watering, weeding, and repairs. Don’t cram plants too close; overcrowding boosts pruning and fungal issues. Skip flimsy landscape fabric under mulch—it tears, weeds root on top, and you’ll spend weekends pulling.
Instead, lay 3–4 inches of mulch on bare soil and edge beds to keep it in place.
Avoid rock “mulch” everywhere; it heats soil, costs more to remove, and traps leaf litter you’ll rake forever. Place Garden art on compacted gravel pads so it won’t sink or tilt.
Finally, don’t ignore Pest control basics: choose resistant varieties, fix drip leaks, and scout weekly to stop outbreaks early.
Frequently Asked Questions
How Can I Keep Deer and Rabbits From Eating My Landscape Plants?
You can stop deer and rabbits by combining barriers, smart plant choices, and deterrents. Install 8-foot deer fencing or use 2×4-inch welded wire 24 inches tall, buried 6 inches, for rabbits.
Choose rabbit-proof plants like boxwood, lavender, and daffodils.
Apply deer repellents after rain and rotate brands so they don’t adapt.
Protect young shrubs with trunk guards, and remove hiding brush piles nearby.
What Low‑Maintenance Landscaping Changes Add the Most Resale Value?
You’ll add the most resale value by making your yard a tidy, reliable “welcome mat”: clean edges, open sightlines, and easy upkeep. Choose xeriscaping designs with drought tolerant plants, simple mulch beds, and a defined walkway—buyers see order, not chores.
Swap patchy lawn for hardy groundcovers, install drip irrigation, and add a few evergreen shrubs for year-round structure.
Use native perennials and group plants by water needs to cut costs.
How Do I Reduce Mosquitoes Without Constant Yard Treatments?
You can cut mosquitoes without constant treatments by focusing on Water management: dump standing water weekly, clean gutters, fix leaky spigots, and refresh birdbaths every 2–3 days. Add a small aerator or fountain to ponds.
Use Natural repellents by planting lavender, rosemary, basil, and citronella near seating, and run a box fan on patios.
Stock rain barrels with tight screens. Keep grass short and trim dense shrubs.
Are There HOA Rules I Should Check Before Replacing My Lawn?
Yes—you should check HOA rules before you replace your lawn.
Picture your yard as a blank canvas, and your HOA as the frame that limits what fits. Review community guidelines for turf removal, plant lists, mulch, gravel, and artificial grass.
Ask about permit requirements for grading, irrigation changes, or hardscape.
Get approvals in writing to avoid fines and rework.
Compare fees, required materials, and ongoing upkeep costs.
What Are the Best Ways to Hide Trash Bins and Utility Boxes?
You’ll hide trash bins and utility boxes best by screening them with decorative fencing, dense shrubs, or a simple slatted enclosure.
Keep access easy: add a gate, leave clearance for lids, and match height to sightlines.
Use container gardens to soften corners and block views without digging near lines.
Choose weatherproof materials (cedar, composite, metal) and anchor panels well.
Check ventilation and keep boxes service-accessible.
Conclusion
You don’t need a huge budget or a pro crew to keep your yard looking sharp—you just need fewer “needy” choices. If you’re worried drought‑tolerant plants and gravel will look stark, mix in natives, a simple edging line, and a fresh 2–3″ mulch layer for instant polish. Lock in the savings with drip zones and a timer so you’re not hand‑watering. Do this once, then spend weekends relaxing, not mowing.