Set a 10-minute timer and grab a trash bag, microfiber cloth, all-purpose spray, lint roller, basket, and mini vac. Toss mail and trash, corral strays, then sweep corners and baseboards. Wipe switches, doors, and trim with a mild soap mix and dry fast. Erase scuffs with a melamine sponge, spackle dings, and feather touch-up paint. Recaulk gaps, swap in a bright LED fixture, add a low-pile runner, and hang hooks plus a tray. Keep going for easy layout and styling upgrades.
Key Takeaways
- Do a 10‑minute reset: toss trash, corral stray items in a basket, quick‑sweep, wipe touchpoints, and clear the walkway.
- Deep-clean walls and trim: dust corners and baseboards, wash with mild soap, degrease around switches, and dry trim to prevent swelling.
- Patch and touch up damage: remove scuffs, fill chips with spackle, sand smooth, prime, and feather matching paint for seamless repairs.
- Update small hardware: replace switch plates, hooks, and knobs in one coordinated finish, and install a simple drop zone shelf or tray.
- Boost light and style: swap to a bright LED flush mount, add a slim mirror to widen the space, and hang a small, cohesive gallery.
10‑Minute Hallway Refresh Checklist (Supplies + Order)
If your hallway looks tired but you’ve only got 10 minutes, you can make it feel cleaner and more intentional by following a tight, supplies-first checklist. Grab a small trash bag, microfiber cloth, lint roller, all-purpose spray, a basket, and a mini vacuum or broom. Start a 10-minute timer.
Minute 1: toss obvious trash and junk mail.
Minutes 2–3: return stray items to their rooms using the basket.
Minutes 4–5: quick-sweep corners, runners, and baseboard edges.
Minutes 6–7: wipe high-touch spots like doorknobs, switch plates, and shelf tops.
Minute 8: lint-roll the runner and any fabric bench.
Minute 9: reset furniture placement so the walkway’s clear.
Minute 10: tighten Color coordination by grouping matching shoes, hooks, and decor.
Clean and Degrease the Hallway Walls and Trim
Because hallways collect fingerprints, scuffs, and invisible grime fast, cleaning and degreasing the walls and trim gives you the biggest “fresh” payoff for the least money. Start high and work down so drips don’t undo your work.
For Wall cleaning, dust first with a microfiber mop or vacuum brush, especially corners and along baseboards. Mix warm water with a few drops of dish soap; use a damp (not dripping) sponge and rinse often.
For Surface degreasing near doors, switches, and handrails, wipe with a diluted degreaser or a 1:1 vinegar-water mix, then follow with clean water to prevent residue. Dry trim with a towel to avoid swelling.
Test any cleaner in a hidden spot, and protect floors with a drop cloth.
Fix Scuffs and Dings: Touch‑Up vs Repaint
After you’ve cleaned everything, you’ll see which marks are just paint transfer and which are true damage, and that’s where you decide between a quick touch‑up and a full repaint.
For transfers, rub lightly with a damp microfiber or melamine sponge; if the base coat stays intact, you’re done. For small chips or dings, spot-fill with lightweight spackle, let it dry, sand flush, then prime the patch so it won’t flash.
Choose touch‑up when damage is isolated and you have the original paint with the same Paint finish. Stir well, then feather thin coats with a small brush or mini roller.
If you don’t have the paint, Color matching often costs more in time than repainting one wall or the whole hallway.
Recaulk and Touch Up Hallway Trim
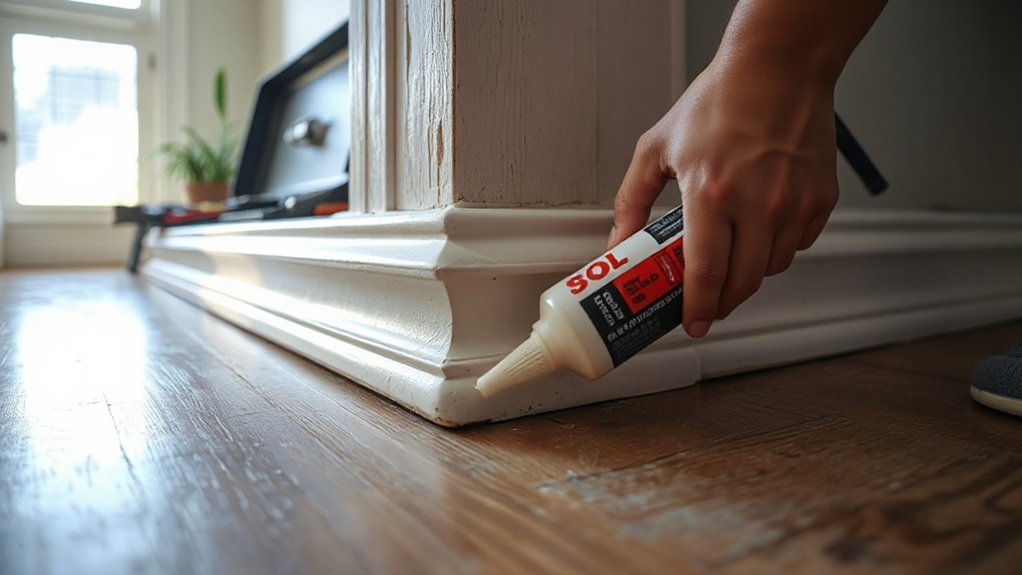
Fresh paint only goes so far when gaps and cracked caulk around trim still telegraph age, so tackle those next. Slice out loose caulk with a utility knife, then vacuum dust so the bead bonds.
Choose paintable acrylic-latex caulk for most trim; use silicone only where water’s an issue. Apply steady pressure and pull the gun, not push, for cleaner Caulking techniques. Tool the bead with a damp finger or caulk tool, wiping often, and keep it thin to avoid a lumpy edge.
Let it cure, then do Trim paint touch up: scuff glossy spots, spot-prime bare wood, and use a small angled sash brush to feather paint onto the trim and slightly onto the wall line.
Brighten the Hallway With Better Lighting
Even if your paint and trim look sharp, weak lighting can still make a hallway feel narrow, dated, and gloomy, so upgrade the light first.
Start by swapping dated lighting fixtures for a low-profile LED flush mount or a slim semi-flush that spreads light wall to wall. If wiring’s fine, you can usually reuse the existing box and just change the fixture.
Next, choose the right bulb brightness: aim for 1,000–1,600 lumens total for a typical hallway, and pick 2700K for warm, 3000K for neutral.
Use high-CRI LEDs (90+) so colors look true. Add a dimmable bulb and a compatible dimmer for evening glare control.
Clean diffusers and shades, too; dust can cut output fast.
Swap Hallway Hardware and Switch Plates
Better lighting shows every small detail, so if your hallway still feels dated, look at the hardware and switch plates next. Swap mismatched knobs, levers, and hinges for coordinated door hardware in one finish—matte black, satin nickel, or aged brass—so everything reads intentional.
Measure your backset and bore size before you buy, and keep the latch style consistent so installs go fast.
Then update switch plate styles. Replace yellowed plastic with crisp white, metal, or paintable plates that match your trim sheen. Count gangs (single, double, triple) and note toggle vs. rocker switches to avoid return trips.
Turn off power, snug screws by hand to prevent cracks, and align plates straight for a cleaner, newer look.
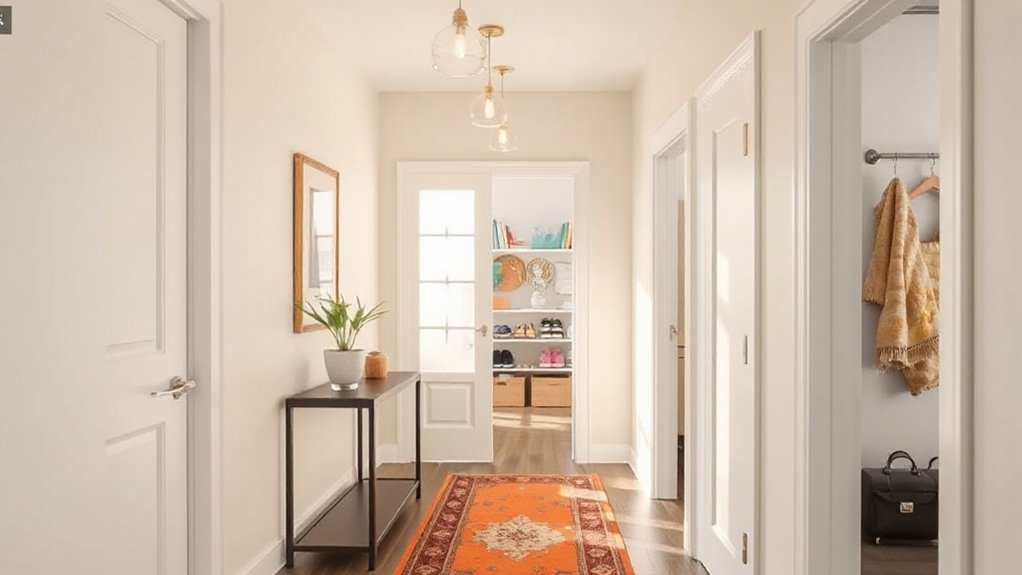
Add a Hallway Runner to Hide and Prevent Wear
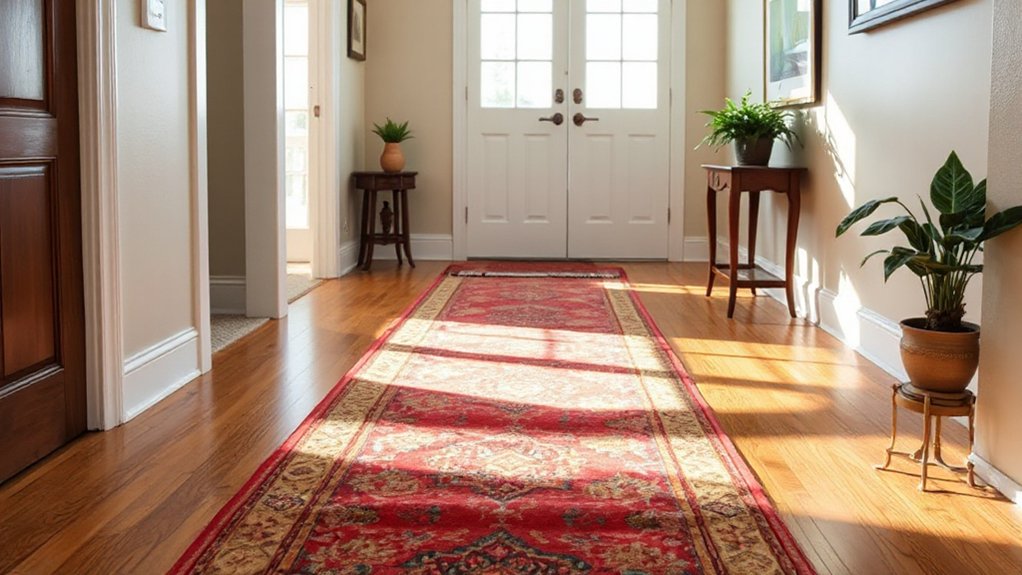
Once you’ve updated the details, lay down a hallway runner to cover existing scuffs and stop new wear in the highest-traffic path. Measure the full length and subtract 6–12 inches so the ends don’t catch under doors.
Choose low-pile, tightly woven fibers (polypropylene or wool blends) that vacuum easily and resist matting. For Decorative rug options, pick a subtle pattern or heathered tone to disguise dirt and minor stains without constant cleaning.
Anchor it with a rug pad cut 1–2 inches smaller than the runner to keep edges neat. You’ll notice immediate Non slip runner benefits: fewer trips, less shifting, and reduced floor abrasion.
If your hallway’s narrow, use a 24–27 inch width for comfortable clearance and consistency.
Add Hooks and a Small Drop Zone for Clutter
Add a row of sturdy wall hooks at shoulder height so you can hang coats, bags, and keys the moment you walk in.
Pair them with a small drop zone station—like a narrow shelf or tray—so mail, sunglasses, and wallets don’t end up on the floor.
Keep it budget-friendly by using a simple hook rail and a compact, wall-mounted ledge that fits your hallway’s width.
Wall Hooks For Essentials
Where does all the daily clutter land the moment you walk in—keys, sunglasses, dog leash, and that one jacket you keep grabbing? Install wall hooks to keep those essentials off the floor and chairs, and you’ll instantly make the hallway feel calmer.
For essential organization, place hooks at shoulder height for adults and a lower row for kids or bags. Use sturdy, screw-in hooks anchored to studs or quality wall anchors; adhesive strips fail with heavy coats. Space hooks 4–6 inches apart so sleeves don’t overlap and get musty.
Choose a matching finish (black, brass, or brushed nickel) to unify mismatched hardware. If you rent, try a rail-mounted hook system that uses fewer holes. Label each hook for consistency daily.
Small Drop Zone Station
Even if you don’t have room for a full console table, you can create a compact drop zone that catches the small stuff before it spreads down the hallway. Mount two sturdy hooks at shoulder height for bags and jackets, then add a narrow wall shelf or picture ledge below for mail, keys, and sunglasses.
If drilling isn’t ideal, use heavy-duty adhesive hooks rated for the load and let them cure overnight. Corral loose items with a small tray, lidded box, or divided organizer—simple storage solutions that keep surfaces clean.
Add a slim basket underneath (or a wall bin) for gloves and dog leashes. Finish with decor accents: a small mirror for last checks and a single framed print above.
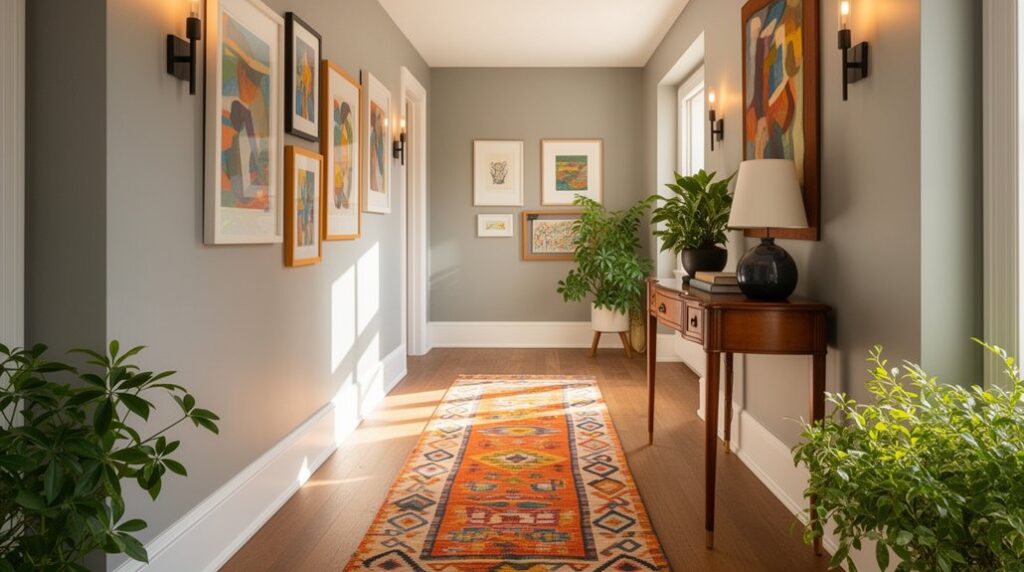
Style a Narrow Hallway With Mirrors and Simple Art
Use a mirror to make a narrow hallway feel wider—hang it opposite a light source or doorway, and choose a clean frame you can find secondhand.
Build a simple art gallery with a few matching frames or printable pieces, keeping colors calm so the space doesn’t feel busy.
Balance scale and spacing by centering everything at eye level, leaving 2–3 inches between frames, and sizing the mirror or main piece to roughly two-thirds of the wall section.
Choose Mirrors For Width
Choose a slim frame in a light finish to avoid adding visual bulk.
Pick a simple rectangular shape for clean lines.
Keep the glass clear, not tinted.
Check glare by standing at both ends before you commit.
Create Simple Art Gallery
Once you’ve hung a mirror that widens the space, back it up with a simple art gallery to keep the hallway from feeling like a pass-through.
Choose a tight theme—black-and-white photos, botanical prints, or line drawings—so it looks intentional, not cluttered.
For a cost-effective art display, use downloadable prints, postcards, or pages from damaged books, then frame them in matching thrifted frames you spray-paint one finish.
Add color accents by repeating one or two hues from a runner, console, or nearby room; a small pop in each piece ties everything together.
Protect walls with adhesive hooks or museum putty, and swap pieces seasonally instead of buying new décor.
Keep glass clean for extra light.
Balance Scale And Spacing
Although a narrow hallway doesn’t give you much wiggle room, you can make it feel wider and calmer by keeping mirror and art sizes in proportion and spacing them consistently.
Start with a quick scale comparison: pick one “anchor” piece (often a mirror) that’s about two‑thirds the width of your console, bench, or wall section, then choose smaller frames that step down gradually.
If you’re mixing shapes, keep the outer edges aligned so the arrangement reads tidy, not busy.
For spacing consistency, use the same gap between frames—2 inches works in tight halls—and keep the centerline at eye level (around 57 inches).
Trace templates on paper, tape them up first, then hang once. You’ll avoid extra holes and wasted hardware.
Frequently Asked Questions
How Can I Reduce Hallway Noise and Echoes Without Major Renovations?
You can cut hallway noise and echoes without renovations by adding soft, absorptive layers. Start with a thick runner rug plus a dense pad, then hang heavy curtains or a fabric wall tapestry to break reflections.
Use weatherstripping and a door sweep to block sound leaks. Place an upholstered bench or bookcase for diffusion.
These soundproofing tips and echo reduction strategies stay affordable and quick to install, and you’ll notice immediate change.
What’s the Best Way to Remove Stubborn Pet Odors From Hallway Carpet?
Like chasing smoke, you’ll beat stubborn pet odors by treating the source, not masking it. For pet odor removal, blot fresh spots, then saturate the area with an enzyme cleaner and let it dwell per label.
After it dries, sprinkle baking soda overnight and vacuum slowly.
Finish with deep carpet cleaning: rent an extractor, use hot water, minimal soap, and run extra rinse passes to prevent residue and re-soiling.
How Do I Protect Hallway Paint From Kids’ Fingerprints Long-Term?
Protect hallway paint long-term by switching to scrub-resistant, washable eggshell or satin and sealing it with a clear, water-based polyurethane made for walls.
Add wall protection with a chair rail, wainscoting, or removable clear film at kid-height for fingerprint prevention.
Keep a microfiber cloth and mild soap spray nearby, and wipe marks weekly before oils set.
Choose darker, mid-tone colors to hide smudges and scuffs.
Are There Renter-Friendly Upgrades That Won’T Risk Losing My Security Deposit?
Yes—you can upgrade without risking your deposit if you stick to reversible changes. Use peel-and-stick Wall decals for interest, then remove them cleanly later.
Try DIY painting with landlord-approved touch-up paint and keep a labeled jar for move-out repairs.
Swap in a new light fixture only if you store the original.
Add removable hooks, a runner rug with grippers, and door stops to prevent scuffs and dings.
How Can I Make a Dark Hallway Feel Wider Without Changing Wall Color?
Make your dark hallway feel twice as wide by cheating the eye with lighting and reflections. Add Lighting enhancements: bright LED bulbs (3000–4000K), plug-in sconces, and under-console strip lights to push illumination to the walls, not the floor.
Use Mirror placements: hang a tall mirror or a row of smaller mirrors on one side to bounce light and extend sightlines.
Keep runners narrow, add slim shelves, and declutter hard.
Conclusion
You don’t need a full renovation to rescue a worn-out hallway—you just need a ruthless, 10-minute game plan. Wipe down greasy walls, hit scuffs with touch-up paint, and recaulk trim until it looks laser-sharp. Upgrade bulbs for instant daylight, then swap dated plates and hardware for a cleaner finish. Drop in a runner to hide battle scars and prevent new ones. Add hooks, a tiny landing zone, and a mirror to make the space feel twice as wide.