
You’ll get cleaner, safer garage or shed organization results when you start with core layout and install tools: a high-contrast tape measure, self-leveling laser level, bubble level, speed square, and painter’s tape or a chalk line for straight reference marks. Find framing with a calibrated stud/joist finder, then mount with the right anchors, a cordless drill and impact driver, and sharp bits that match your fasteners. Add a circular saw, modular bins, and a label maker—there’s more ahead.
Key Takeaways
- Use a high-contrast tape measure, stud finder, and laser level to plan layouts, locate framing, and align storage accurately.
- Mark footprints and reference lines with painter’s tape, squares, carpenter’s pencil, and a chalk line for straight, repeatable placement.
- Rely on a cordless drill and impact driver with quality bits, plus the right anchors or structural screws for your wall material and load.
- Cut shelving and panels cleanly with a circular saw and straightedge, fine-tooth blades, and a miter saw for trim and small parts.
- Keep installs efficient with modular organizers, labeled bins, and regular tool cleaning, lubrication, and dust removal to prevent failures.
Garage Organisation Tools to Buy First (Priority List)
Before you buy bins and hooks, start with the tools that let you measure, mark, and mount everything quickly and safely: a tape measure, stud finder, level, drill/driver with a bit set, and a basic socket/driver set.
Add a pencil, painter’s tape, and a speed square so your marks stay true and repeatable.
For fast, clean installs, pick up a step stool or small ladder, safety glasses, and hearing protection.
A compact vacuum, shop broom, and magnetic parts tray keep hardware from disappearing and help Garage storage go faster.
Round out your priority list with a utility knife, pliers, and a sturdy adjustable wrench for quick fixes during Shed maintenance.
Buy quality bits; stripped heads waste time.
Layout Planning Tools for Wall and Ceiling Space
Before you mount shelves, racks, or hoists, you’ll get faster results by planning your wall and ceiling layout with the right tools.
Use wall layout grid planners to map spacing and storage zones.
Then run ceiling clearance mapping tools to confirm door travel, lighting, and lift paths won’t conflict.
Finish by scanning with stud and joist finders so every anchor point hits solid framing.
Wall Layout Grid Planners
When you’re trying to fit cabinets, pegboard, and overhead racks onto limited wall and ceiling space, a wall layout grid planner lets you map every inch before you drill a single hole. Start by measuring wall length, stud spacing, outlets, and door swing, then transfer those numbers onto wall grid templates for an accurate scale plan.
You’ll spot conflicts early, like a cabinet blocking a switch or a pegboard panel landing between studs.
If you prefer digital, use layout visualization software to drag, resize, and align components while keeping clearances consistent. Print the final grid, tape it to the wall, and mark fastener points with confidence.
You’ll reduce wasted holes, speed installs, and end up with a clean, symmetrical layout that actually fits your tools.
Ceiling Clearance Mapping Tools
Although wall storage gets most of the attention, ceiling clearance mapping tools keep you from installing overhead racks, garage door tracks, or lift systems where they’ll clash.
Start with a laser distance meter to capture floor-to-ceiling heights and slopes fast, then log readings in a simple plan app or spreadsheet so you can compare bays.
Use a digital angle gauge to verify ceiling pitch and the drop of rails, ducts, or lights.
A telescoping measuring pole with a level lets you mark consistent reference heights along the ceiling line.
Finish with painter’s tape and a chalk line to outline the footprint of proposed overhead storage on the floor, then test door travel and vehicle clearance before you drill.
You’ll avoid rework and protect headroom.
Stud And Joist Finders
Even if your walls look flat and uniform, the framing behind them rarely lines up where you expect it, so a stud and joist finder keeps your layout plan honest. Use it before you mark shelf brackets, French cleats, or pegboard rails, and you’ll avoid weak drywall anchors and surprise pipes. Scan slowly, confirm both edges, then pencil the centerline for reliable stud placement.
For ceilings, map joists the same way so overhead racks land on solid structure. Note joist spacing across the full span; garages often vary near doors or patched areas. Choose a finder with deep-scan and AC warning, and recalibrate when you move between bays.
With verified framing lines, you can pre-drill accurately, cut fewer holes, and hang heavier loads confidently.
Measuring Tools for Straight Garage Installs
To get straight, repeatable installs in your garage, you’ll start with a precision tape measure and confirm every key dimension twice before you cut or drill.
You’ll run a laser level to lock in consistent height lines across studs and corners, then mark fastener points with confidence.
You’ll finish by checking 90° and keeping rails, shelves, and cabinets square with a reliable framing or combination square.
Precision Tape Measures
When you’re installing wall tracks, shelving rails, or cabinet runs in a garage, a precision tape measure keeps every layout mark dead straight and repeatable. Prioritise measuring accuracy by choosing a tape with clear, high-contrast markings, a rigid standout, and a true-zero end hook that moves freely but doesn’t wobble.
Match tape measure types to the job: use a 5–8 m (16–25 ft) compact tape for tight bays, or a wider-blade 10 m (33 ft) tape for long walls and overhead runs. Look for a durable blade coating, a strong lock, and a bottom-reading scale so you can measure off the floor without twisting.
Always burn an inch, note stud centres, and record cut lists immediately.
Laser Levels And Squares
Although a good tape measure gets you close, a laser level and a solid square lock your garage installs into true level, plumb, and 90°—so wall tracks, shelf standards, and cabinet runs line up without shims and rework.
Choose a self-leveling cross-line laser with a bright beam, plus a magnetic mount or tripod so you can set a consistent reference line around the room. Use it to mark stud centers, establish shelf heights, and keep slatwall panels dead straight for precision alignment.
Pair it with a 7″ or 12″ speed square for quick 90° checks, and a framing square when you’re laying out tall cabinets or workbenches. You’ll boost layout accuracy, cut cumulative errors, and finish faster with cleaner reveals.
Marking Tools for Accurate Shelf and Rail Lines
Because your shelves and rails only install as straight as your layout lines, you need marking tools that lock in repeatable measurements and stay visible on rough garage walls. Start with a quality tape measure and a solid carpenter’s pencil; sharpen it often so your marks don’t creep.
Use a marking knife on plywood templates for precision marking when you’re transferring hole spacing or bracket positions. Snap a chalk line for long runs, then seal the line with a quick pass of clear spray or a light mist of water so it doesn’t smear while you work.
Keep a combination square handy to extend consistent offsets from edges and to verify line accuracy at corners. Finish by labeling heights and reference points with a fine-tip permanent marker.
Stud Finders and Anchors for Safe Garage Shelving
Even if your layout lines look perfect, your garage shelving won’t stay safe unless you hit studs or choose anchors rated for the real load. Use a quality stud finder, calibrate it on open drywall, then scan slowly to mark both stud edges and the center.
Prioritise stud finder safety: verify with a second pass and avoid mounting where wiring or plumbing indicators trigger.
When you can’t land on studs, do an anchor types comparison based on wall material and load. Toggle bolts excel in hollow drywall for heavy shelves; metal self-drilling anchors suit light-duty bins; sleeve or wedge anchors belong in masonry; and structural screws work best in wood studs.
Match the anchor’s rated shear/pullout to loaded weight, and spread loads across multiple fasteners.
Drills, Drivers, and Bits for Mounting Garage Systems
When you mount rails, cabinets, or wall tracks in the garage, the right drill/driver setup determines whether fasteners bite cleanly or strip out under load. Choose one of your Cordless drills with a clutch and two speeds: low for driving, high for drilling pilot holes.
Pair it with an impact driver for lag screws and structural fasteners so you don’t stall out in studs. Keep a sharp set of driver tips on hand; quality screwdriver bits (Torx, square, Phillips) reduce cam-out and save fastener heads.
Use a magnetic bit holder for reach and quick swaps. Match bit size to fastener, and pre-drill into dense lumber to prevent splitting. Carry spare batteries and a charger nearby.
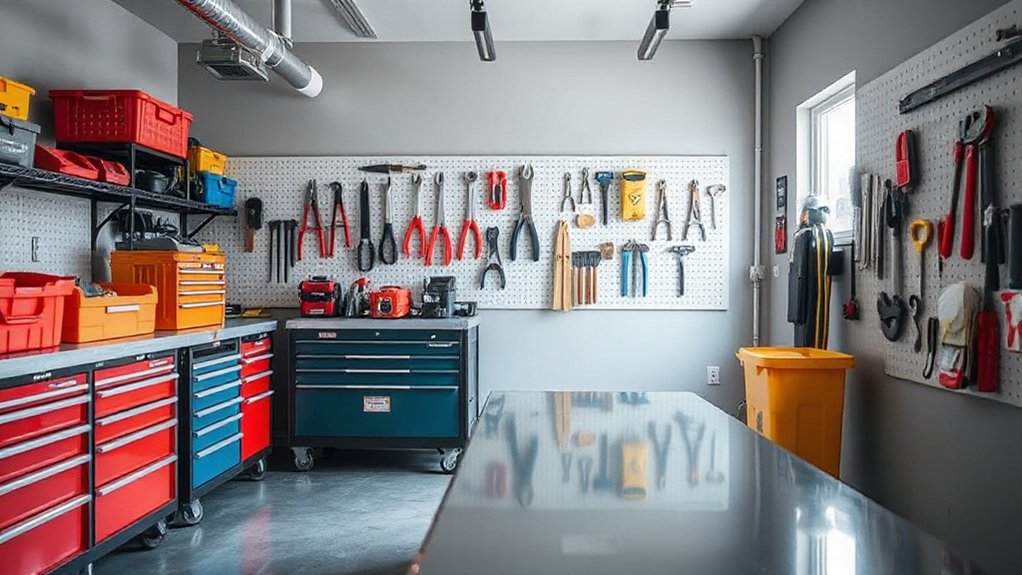
Cutting Tools for Shelves, Panels, and Brackets
Once you’ve got the rails and fasteners sorted, clean, accurate cuts are what make shelves sit flat, panels fit tight, and brackets line up without fighting you.
Start with a circular saw and a straightedge guide for plywood and melamine; it’s fast and repeatable. Swap to a fine-tooth blade to reduce chip-out, and keep spare cutting blades on hand so you’re not forcing dull teeth through sheet goods.
For smaller parts, a miter saw gives square, consistent cuts on cleats and trim.
If you’re breaking down full sheets often, panel saws or a track saw save space, improve control, and keep cuts dead straight.
Finish edges with a sanding block or file so brackets seat cleanly.
Measure twice, cut once, every time.
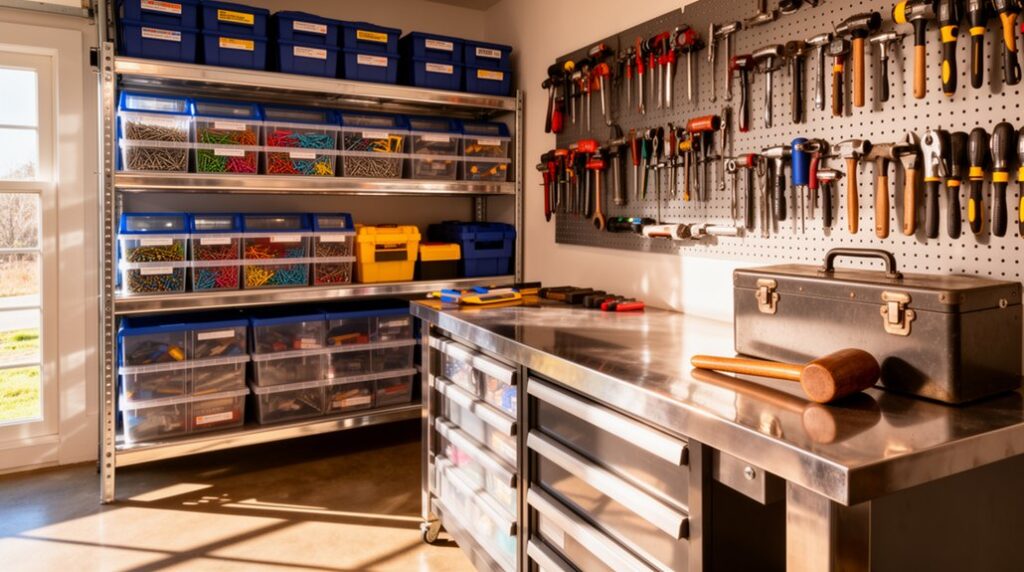
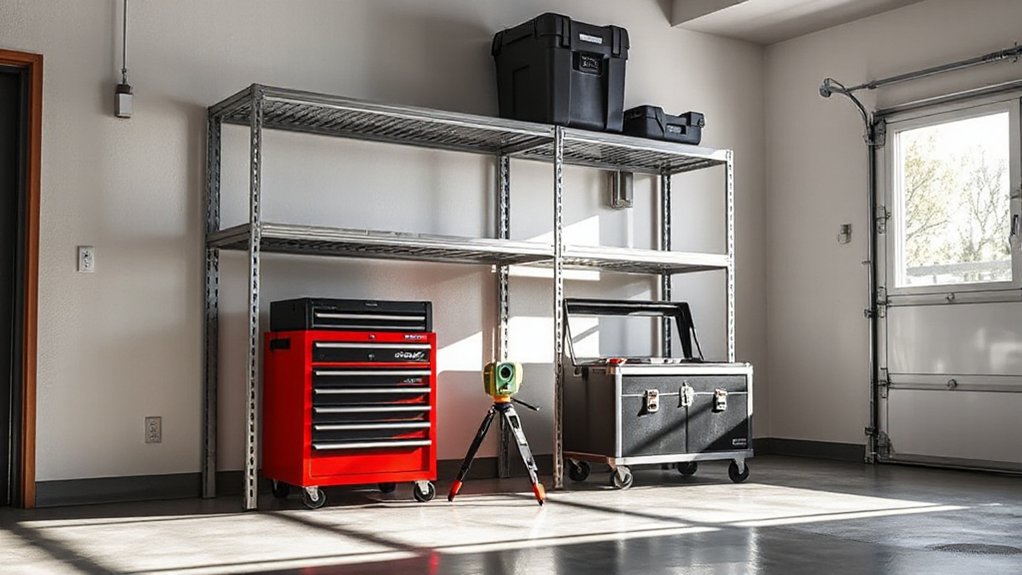
Toolboxes and Small-Parts Organisers for Install Day
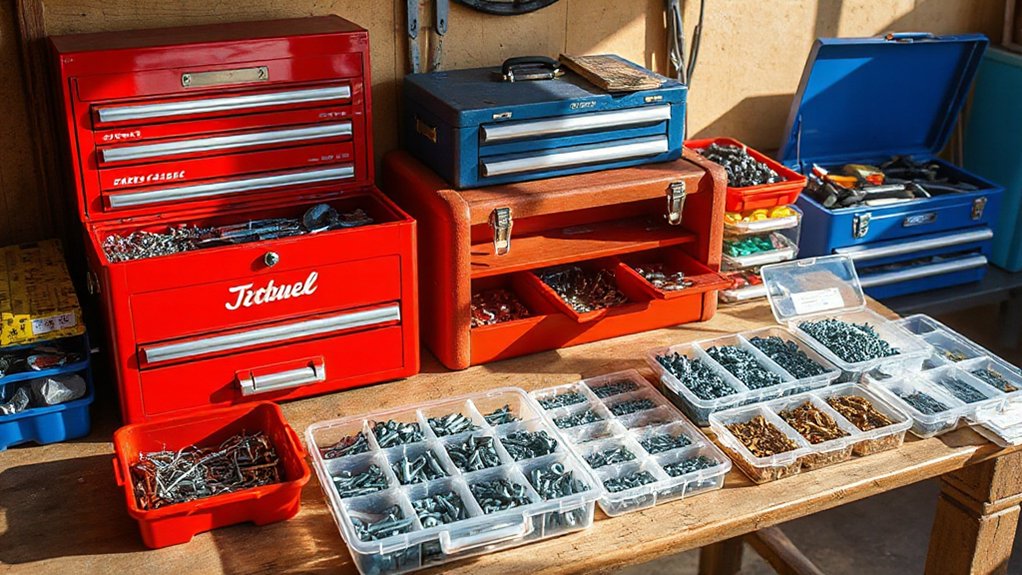
Because install day moves fast and mistakes compound, you need a toolbox and small-parts organiser that keeps every bit, screw, and anchor visible, labeled, and within arm’s reach.
Choose a cantilever toolbox for hand tools and a modular organiser with removable bins for fasteners by size and task.
Use a deep tray for drivers, impact bits, and a tape measure, and a top-access compartment for pencil, square, and utility knife.
Pick clear-lid cases so you confirm contents at a glance and avoid mid-job trips.
Stackable latches keep kits tight in the truck and clean on the bench, supporting Garage aesthetics.
Pair your organiser with bright shed lighting solutions so you spot tiny washers and match hardware instantly.
Labeling and Cleaning Tools to Keep It Organised
Although a tidy layout starts with smart storage, labels and regular cleaning keep your tools returning to the right spot and working reliably. Set up labeling systems that match how you work: bin fronts for fast grabs, drawer edges for hidden storage, and color bands for categories like electrical, plumbing, and fasteners. Use a label maker with durable tape, and add dates to adhesives, finishes, and batteries so you don’t guess later.
Keep a small caddy of cleaning supplies: shop towels, degreaser, a nylon brush, compressed air, and light machine oil. After each job, wipe handles, blow dust from vents, clean threads, and oil pivots. You’ll prevent rust, reduce jams, and spot wear before it becomes a breakdown.
Frequently Asked Questions
What’s the Best Humidity Control for Sheds to Prevent Tool Rust?
You’ll get the best rust prevention by keeping shed humidity under 50% with tight sealing, steady airflow, and smart Climate monitoring.
Start with a hygrometer, then act on readings.
For Dehumidifier choices, pick a compressor unit for warm sheds, a desiccant model for cold ones, and size it to your shed’s cubic feet.
Add silica gel in tool chests, oil metal surfaces, and avoid wet lumber storage.
How Do I Deter Rodents and Insects in a Garage Storage Area?
You deter rodents and insects by sealing entry points, removing food sources, and setting targeted traps.
Start with rodent proofing strategies: caulk cracks, add door sweeps, cover vents with 1/4-inch metal mesh, and store goods in lidded plastic or metal bins.
Then apply insect deterrent methods: sweep debris, dehumidify, fix leaks, use sticky traps, and apply perimeter treatments like diatomaceous earth or labeled residual sprays.
Recheck monthly, and adjust as needed.
What Lighting Upgrades Improve Visibility in Garages and Sheds?
Upgrade visibility by switching to bright LED lighting with high lumens and a 4000–5000K color temperature for crisp detail.
Add motion-sensor fixtures so you don’t fumble for switches.
Install task lighting over benches, tool walls, and workstations to eliminate shadows where you cut or label parts.
Use reflective light-colored paint to boost bounce.
Aim fixtures lengthwise down bays, and add weather-rated housings in sheds.
How Can I Reduce Dust and Fumes When Organising a Working Garage?
Strap on your “Apollo-era” mission mindset: you’ll cut dust and fumes by moving air out and capturing particles at the source. Install ventilation systems with an exhaust fan and a filtered intake, then seal gaps to control airflow.
Add dust collection to your saws and sanders, empty bins often, and use a HEPA shop vac for floors.
Store solvents in closed cabinets, cap containers, and run fans during projects daily.
What Flooring Options Handle Heavy Storage and Resist Oil Stains?
For heavy storage and oil resistance, you’ll get the best results with epoxy coatings or interlocking Rubber tiles.
Epoxy coatings bond to concrete, seal pores, and wipe clean after spills; choose a high-solids, chemical-resistant kit and add a non-slip grit.
Rubber tiles cushion drops, handle point loads, and let you swap a stained tile fast.
Avoid bare concrete and cheap paint—they’ll absorb oil and chip.
Conclusion
Funny coincidence: the moment you finally buy a stud finder and a decent driver, you’ll spot the wasted wall space you’ve ignored for years. Start with the priority tools, then measure, mark, and mount in that order so shelves stay level and rails land on studs. Keep bits, anchors, and fasteners sorted in a small-parts organiser so installs don’t stall. Finish by labeling zones and doing a quick sweep—you’ll keep it organised.

