Table of Contents
Key Takeaways
- A reclaimed wood fireplace mantel is one of the most visually transformative things you can do to a living room — and it is far more achievable as a DIY project than most people assume.
- Timber selection matters enormously; the mantel sits at eye level and commands attention, so the grain, colour, and surface character of the wood will be seen in detail every day.
- Safety is non-negotiable — reclaimed timber must be kept at a safe distance from the heat source, and the relevant regulations must be understood and followed before work begins.
- A single beam or thick plank used as a shelf mantel is the most common approach and the most straightforward to execute well.
- Fixing must be solid — a mantel carries decorative weight and takes the occasional knock, and a poorly fixed shelf is a hazard as well as an eyesore.
- The right finish protects the timber and enhances its character without dulling the qualities that made you choose reclaimed wood in the first place.
The Fireplace Was the Problem With the Room
Every room has one — the thing that is almost right but not quite, the element that stops everything else from settling into place. In our sitting room, it was the fireplace. The opening itself was fine: a good size, well-proportioned, original to the house. The problem was what surrounded it. A flat, featureless painted shelf sat above the opening on two painted brackets, contributing nothing. It was the visual equivalent of a placeholder.
We had known for a while that the answer was a reclaimed wood fireplace mantel — a proper beam, something with weight and presence and the kind of surface character that a painted MDF shelf simply does not have. What held us back was uncertainty about the process. How do you find the right piece of timber? How do you fix it safely? How close to the fire can it go?
It turned out to be more straightforward than we had expected. This is the full account of how we did it.
Understanding the Safety Requirements First
Before any timber is sourced or any tools are picked up, the safety requirements around a fireplace mantel must be understood. This is not an area where it is acceptable to estimate or approximate — combustible materials near a heat source are a genuine fire risk if the clearances are wrong.
The Regulations
Building Regulations in England and Wales (Approved Document J) set out the minimum distances between combustible materials and fireplace openings. The specific requirements depend on the type of fire — open fire, gas fire, wood-burning stove, or electric — and the dimensions of the fireplace opening. As a general rule:
For an open fire or solid fuel appliance, no combustible material should be within 300mm of the fireplace opening measured horizontally, or within 225mm measured at an angle above the opening. For a gas fire, the manufacturer’s instructions will specify clearance requirements, which must be followed. For an electric fire, requirements are generally less stringent but the manufacturer’s guidance still applies.
These figures represent minimums. The standard practice for a mantel shelf sitting above a fireplace opening is to position the underside of the shelf at a height that places it comfortably outside the required clearance zone — typically at least 150mm above the top of the fireplace opening for a gas or electric fire, and significantly more for an open fire or wood-burning stove.
If you are in any doubt about the specific requirements for your fireplace configuration, consult a qualified installer or your local building control authority before proceeding. A chimney or heating engineer can advise on the correct clearances for your specific appliance and opening dimensions. Do not guess.
Timber and Heat
Reclaimed wood, like all timber, is combustible. An old oak beam that has survived a century of use is no more fire-resistant than a new one. The safety clearances exist precisely because timber at sustained elevated temperatures will eventually ignite. Correct positioning of the mantel is not optional, and it should be checked against the specific requirements for your fire type before the fixing positions are marked.
Finding the Right Piece of Timber
A fireplace mantel is a single-piece statement. Unlike a dining table or a floor, where you are working with multiple boards and the visual effect comes from the assembly, a beam mantel lives or dies on the quality of the individual piece of timber you choose. Take the time to find a good one.
What to Look For
The ideal piece for a mantel shelf is a beam or thick plank with a face that is broadly flat — or at least flat enough to work with — a depth from front to back that gives the shelf a proper, useful presence, and a length that suits your chimney breast width with a small overhang at each end.
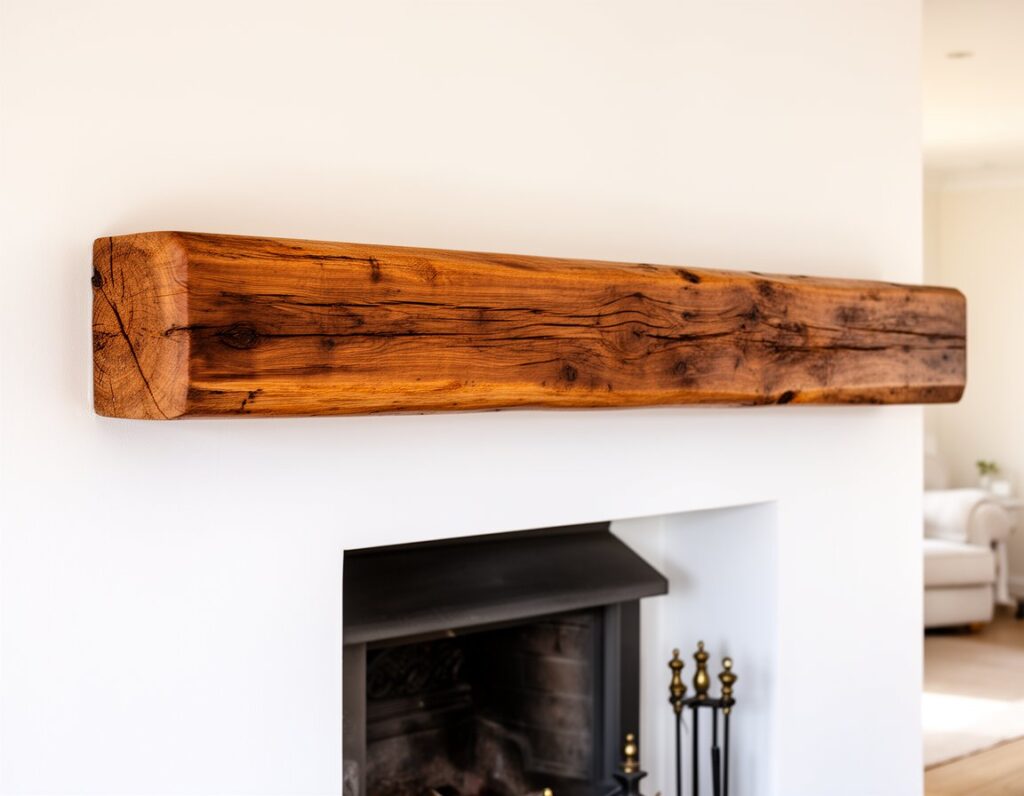
For our fireplace, the chimney breast is 140cm wide. We wanted the mantel to overhang by around 10cm at each end, giving a total length of 160cm. The depth front-to-back was 22cm — generous enough to display things on without looking mean, proportionate to the scale of the chimney breast.
Thickness is worth thinking about carefully. A mantel that is too thin looks inadequate above a fireplace opening. We went to 12cm — this gives the mantel genuine visual weight and a pleasing shadow line below the shelf without making it look like a structural beam that belongs in a ceiling rather than above a fire.
Species
Oak
The default choice for reclaimed mantels, and for good reason. Old oak has the density, the grain character, and the surface presence to carry the eye-level scrutiny that a fireplace mantel receives. Reclaimed oak beams — particularly those with an adzed or hand-worked face rather than a machine-sawn one — have a surface quality that is simply not available in new timber. The colour deepens over time and the grain becomes more defined as the timber oxidises in the warmth of the room. For a traditional, country, or period interior, reclaimed oak is close to the perfect material.
Elm
Elm’s interlocking, wild grain makes it one of the most visually dramatic choices for a mantel. A section of old elm at eye level above a fireplace becomes a conversation piece in its own right. It is less commonly available than oak, but specialist reclamation yards and architectural salvage companies often carry it. If you find a piece in good condition at the right dimensions, it is worth serious consideration.
Pine and Pitch Pine
For a softer, warmer look — particularly in a more relaxed, informal interior — reclaimed pine or pitch pine can work beautifully. Old pitch pine from a Victorian mill or church has a warmth of colour and a resinous density that makes it far more characterful than its reputation as a secondary species might suggest. It is also typically more affordable than oak, which matters if the budget is being stretched by other elements of a room renovation.
Driftwood and Weathered Coastal Timber
For coastal, bohemian, or highly eclectic interiors, heavily weathered and bleached timber — the kind found washed up or salvaged from coastal structures — makes for a mantel with extraordinary surface texture. The silvery grey of weathered timber against a white or lime-washed chimney breast is a striking combination. This approach requires the most careful structural assessment, as weathered timber can harbour hidden deterioration, but when the right piece is found the result is like nothing else.
Where to Source It
Specialist reclamation yards are the most reliable source. Visit in person where possible — a mantel beam needs to be seen and assessed in three dimensions, not selected from a photograph. Architectural salvage companies often carry beams that have already been partially cleaned and assessed. Farm sales and demolition salvage are worth investigating for more unusual pieces at potentially lower cost.
Planning the Installation
The Supporting Structure
A reclaimed timber mantel shelf needs a proper fixing solution. The two most common approaches are wall-mounted metal brackets concealed within the timber, and a timber or steel frame fixed to the chimney breast wall with the mantel sleeved or sat over it.
Concealed Steel Brackets
Our chosen method. Two lengths of 25mm square steel bar were fixed horizontally into the chimney breast wall using 100mm structural bolts into raw plugs. The bars project 180mm from the wall — slightly less than the depth of the mantel, so they are completely hidden once the beam is in place. Corresponding slots were routed into the back face of the beam to accept the bars, and the beam was slid onto the brackets from the front. No visible fixings, no brackets on show, and a result that looks as though the beam is growing out of the wall.
This method requires a router with a straight bit and a careful measurement of the bracket positions relative to the routed slots. It is not technically difficult but it demands precision — the slots must align with the brackets, and the depth of the slot must allow the beam to sit flush against the wall without rocking. Dry-fit everything before the final installation.
Surface-Fixed Brackets
The simpler alternative. Heavy-duty shelf brackets — either off-the-shelf or fabricated steel — are fixed to the chimney breast wall and the mantel sits on top, fixed through the top face or from below through the bracket. This is structurally reliable and easier to execute than concealed brackets, but the brackets will be visible below the shelf unless they are covered by a separate fascia or apron board. For a traditional mantel surround design that includes pilasters and a frieze, this is often the logical approach.
Timber Frame
For a more complete mantel surround — with vertical supports (pilasters) and a horizontal frieze board below the shelf — a timber frame fixed to the chimney breast wall provides the structure that everything else attaches to. This is a more ambitious project than a simple shelf mantel, but produces a more architecturally complete result that can be designed to complement the period and style of the room.
Marking Out
With the safety clearances confirmed and the fixing method chosen, mark the final position of the mantel on the chimney breast wall. Use a long spirit level to ensure the shelf line is truly horizontal — a mantel that runs visibly downhill is one of those things that once noticed cannot be unnoticed. Mark the positions of all fixings and check them against each other before drilling anything.
The Build Process
Step One: Preparing the Beam
Our beam arrived from the reclamation yard in good condition but with the surface still showing the grime and weathering of its previous life as a structural element in a barn. The first task was cleaning.
We wire-brushed the face and sides thoroughly to remove loose material, then swept the full length with a strong magnet to locate hidden fixings. We found three — a cut nail driven in at an angle, a fragment of a larger bolt, and what appeared to be part of a staple, all invisible beneath the surface grime until the brush revealed them. All came out with a nail punch and pliers.
The face was then worked with a hand plane — not to remove all of the surface character, but to bring it to an even, consistent level that would take finish properly and provide a usable shelf surface. We left the saw marks, the slight undulations, and the occasional deeper mark that were part of the beam’s character. What we removed was loose material, uneven high spots that would catch dust, and the very topmost layer of weathered grey.
The ends were cross-cut square with a circular saw guided by a square, then softened with a hand plane and sandpaper. We left the face of the beam largely unsanded — orbital sanding reclaimed oak to a smooth finish erases the surface texture that is the whole point of using the material.
Step Two: Routing the Bracket Slots
With the beam face-down on the workbench, the positions of the bracket slots were marked on the back face using the measurements taken from the wall. Each slot was routed in three passes of increasing depth using a straight bit in a plunge router — taking the full depth in one pass risks tearing the grain and is harder to control. The finished slots were 26mm wide, 26mm deep, and 200mm long — giving a generous fit around the 25mm brackets with room for adjustment during installation.
The fit was checked by dry-fitting the beam onto the brackets before any finish was applied. Adjustments to the slot depth were made with a sharp chisel. The beam should slide onto the brackets with light resistance — tight enough that it will not shift in use, loose enough that installation is possible without a mallet.
Step Three: Finishing Before Installation
We finished the beam before fixing it in place — it is significantly easier to apply finish to all faces on a workbench than to work around a mantel that is already fixed to a wall.
We used a medium oak hardwax oil — Osmo Polyx in 3072 — applied with a flat brush in the direction of the grain. Two coats, with a light abrade using fine steel wool between coats. The finish deepened the colour of the oak considerably and brought out the grain in a way that the dry, unfinished surface had not shown. The surface character — the plane marks, the nail holes, the grain pattern — all became more defined and more beautiful as the oil went on.
We masked off the back face where it would meet the wall and the inside of the bracket slots, as finish in these areas serves no purpose and can affect the fit.
Step Four: Installation
Two people are needed for this stage. One to hold and guide the beam, one to ensure alignment. We lifted the beam into position, aligned the routed slots with the projecting brackets, and slid it slowly home. The fit was snug without being tight — the beam sat flush against the chimney breast wall with no rocking and a level shelf surface confirmed with a spirit level.
A single fixing through the top face of the beam into the wall above — countersunk, filled with a wooden plug of the same species, and finished to match — was added as a safety measure, though the bracket arrangement alone was more than sufficient to support the load.
Step Five: Final Finishing In Situ
A final application of finishing oil to the face and sides of the mantel, in place, addressed any areas missed during the bench finishing stage. The cut ends where the beam met the wall on each side were touched in with a brush. Once cured — forty-eight hours — the mantel was ready.
The Result
The effect of a properly sourced, well-fixed reclaimed oak beam above a fireplace opening is difficult to overstate. The room changed character immediately. The fireplace became the focal point it should always have been — not because we had done anything architectural, but because the right material, at the right scale, in the right position, has a presence that no painted shelf bracket can approach.
The mantel has been in place for eighteen months. The warmth of the room has deepened the colour of the oak slightly. A few new marks have joined the historical ones. It looks more settled with every month that passes.
Frequently Asked Questions
How close to the fire can a reclaimed wood fireplace mantel be?
The minimum distances are set out in Building Regulations Approved Document J. For an open fire, no combustible material should be within 300mm horizontally of the fireplace opening. For a gas fire, follow the appliance manufacturer’s specifications, which typically require the shelf underside to be at least 150mm above the top of the opening — though this varies by appliance. For a wood-burning stove, the clearances are generally more generous than for an open fire, as the stove casing contains the heat, but must still be confirmed against the stove manufacturer’s instructions and relevant regulations. When in doubt, ask a qualified installer — the consequences of getting this wrong are severe.
Does a reclaimed wood mantel need treating for fire resistance?
A correctly positioned reclaimed timber mantel — sitting outside the required clearance distances for your specific heat source — does not require fire-retardant treatment as a condition of installation. Standard fire retardant treatments for timber are not a substitute for correct positioning; they slow ignition but will not prevent combustion in a sustained heat scenario. The correct approach is to position the mantel at the required clearance distance in the first place, not to rely on a treatment to compensate for incorrect positioning.
How do I fix a reclaimed beam mantel to a chimney breast?
The two most reliable methods are concealed steel brackets routed into the back of the beam, and surface-fixed heavy-duty shelf brackets. Concealed brackets give the cleanest visual result — the beam appears to float from the wall with no visible hardware — but require precise routing and careful measurement. Surface brackets are easier to install and equally strong, but the brackets are visible unless covered by a fascia. For either method, fixings must go into solid masonry or structural timber, not simply into plasterboard. A chimney breast is typically solid brick or blockwork beneath the plaster, which provides a reliable fixing base.
Can I use a reclaimed wood mantel with a wood-burning stove?
Yes, provided the clearances are correct for your specific stove. Wood-burning stoves transfer heat primarily through their casing and flue rather than through direct radiation from an open flame, which means the heat profile around the opening is different from an open fire. However, the stove flue pipe passing through or near the chimney breast can also generate significant heat, and the full installation — stove, flue, and mantel — needs to be assessed together. A HETAS-registered installer can advise on the correct clearances for your stove model and installation configuration.
What is the best finish for a reclaimed wood fireplace mantel?
A penetrating hardwax oil — Osmo Polyx, Rubio Monocoat, or a similar product — is the best choice for most reclaimed timber mantels. These products enhance the natural character of the grain and surface, protect against the occasional knock or light surface contact, and can be refreshed with a maintenance coat without stripping back. They also tolerate the warmth of a fireplace environment better than a surface lacquer, which can become brittle and crack with repeated heating and cooling cycles.
Avoid water-based polyurethane on reclaimed timber — it tends to sit on the surface of open-grained old wood, can peel, and does not suit the material aesthetically. For a very raw, natural look, a simple wax applied over a base oil coat works well and is entirely appropriate for a piece that will not be in direct contact with food or water.
Conclusion
A reclaimed wood fireplace mantel is one of those changes that makes a room feel permanently better. Not in a way that fades as the novelty wears off — in a way that deepens as the timber settles into its position and the room arranges itself around it. A good piece of old oak or elm above a fireplace opening does not look like a design decision. It looks like it belongs.
The project asks for careful planning, respect for the safety requirements, and patience in finding the right piece of timber. None of that is beyond a confident DIYer with access to basic tools and a willingness to take their time with the sourcing. The result, when it is done properly, is a focal point that no showroom can supply and no catalogue can replicate.
For everything you need to know about working with the material — sourcing, preparation, species selection, and finishing — our complete guide to reclaimed wood is the place to start.