Table of Contents
Key Takeaways
- Reclaimed wood shelves are one of the most accessible entry points into working with salvaged timber — the quantities are manageable, the tools required are modest, and the impact on a room is immediate.
- Wall preparation and fixing is where most shelf projects succeed or fail; understanding what is behind your walls before drilling is not optional.
- Board thickness, bracket choice, and span length all determine whether shelves perform structurally — good-looking shelves that sag under load are not good shelves.
- A single run of reclaimed shelving in an alcove, across a chimney breast, or along a kitchen wall can define the character of a room more effectively than almost any other single change.
- The finish you choose needs to suit the use — kitchen shelves carrying oils and foodstuffs need different treatment from living room shelves holding books and ornaments.
- Getting the preparation right — fixings removed, timber dried, surfaces properly cleaned — takes more time than the installation itself, and determines the quality of the result.
The Project That Convinced Us Reclaimed Timber Was Worth the Effort
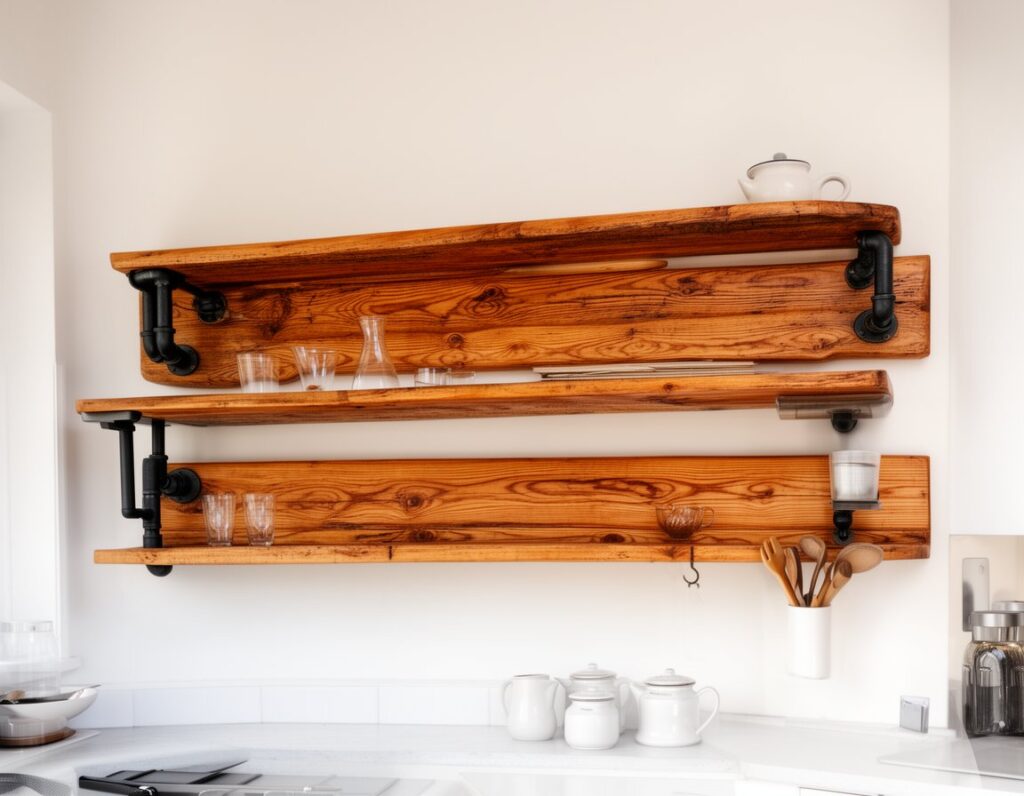
We had been planning the kitchen shelves for months. The wall above the worktop on the far side of the kitchen — a long, unbroken run of painted plaster with nothing on it — was the last significant thing in the room that was not finished to our satisfaction. It needed shelving. Not white-painted MDF brackets and boards from a DIY chain. Something with character. Something that looked as though it had always been there.
A pair of reclaimed wood shelves turned out to be exactly that. The project took a weekend — more of that time spent on preparation and fixing than on anything that would traditionally be called carpentry. The result is the element of our kitchen that visitors notice first and ask about most. This is how we did it.
Why Reclaimed Wood Works So Well for Shelving
Shelving is furniture that lives on the wall at eye level. Unlike a floor, which is largely seen from above and at a distance, or a table, which is viewed across rather than straight at, shelves are looked at directly — the face of the timber is the first thing you see when you enter a room. That means surface character matters more in a shelf than almost anywhere else.
Reclaimed timber has that character built in. The grain pattern of old oak, the warm amber of aged pitch pine, the silvery weathered face of barn timber — these are qualities that present themselves beautifully at eye level in a way that smooth, pale new timber does not. The nail holes, saw marks, and subtle undulations in the surface of genuinely old wood give shelves a sense of permanence and authenticity that is very difficult to achieve with new materials, however they are treated or finished.
There is also a practical argument. Properly sourced and prepared reclaimed timber — particularly reclaimed hardwood — is denser and harder than most new commercial softwood used in budget shelving. Old pitch pine, Victorian oak, and salvaged elm all have a structural solidity that makes them inherently better shelf materials than the softwood boards sold in DIY multiples. They resist bowing under load more effectively, they take fixings more securely, and they tolerate the occasional knock without denting.
Planning the Shelves
Deciding on Dimensions
Our kitchen shelves are each 180cm long, 25cm deep front-to-back, and 40mm thick. These dimensions suited the space — the run of wall, the height of the ceiling, and the scale of the kitchen — but the right dimensions for any shelving project start with the room and the intended use rather than with what timber happens to be available.
Depth is the first dimension to establish. Kitchen shelves carrying everyday items — oils, jars, plates, mugs — need to be at least 25cm deep to be genuinely useful. Living room shelves for books need a minimum of 22cm, and deeper is better. Decorative shelves carrying lighter, smaller objects can be as little as 15cm deep. Get the depth right for the use before looking for timber.
Length between supports determines the structural demands on the shelf. As a general rule, timber shelving 40mm thick should not span more than 90–100cm unsupported. Thinner boards — 25–30mm — should not span more than 70cm. Beyond these spans, sagging under load becomes a genuine risk, regardless of how dense the timber is. If the run of shelving requires a longer span, either add a central bracket or increase the board thickness.
Height is the dimension most often underestimated. The spacing between shelves needs to be generous enough to be genuinely useful — at least 30cm between kitchen shelves, at least 25cm between book shelves — and the height of the lowest shelf above a worktop or floor needs to be comfortable for use without stooping or stretching.
Choosing a Bracket Approach
The bracket is not just a structural element — it is a visible part of the finished shelf, and the choice of bracket style significantly affects the overall look of the piece.
Traditional Steel Brackets
Heavy-duty steel shelf brackets — either off-the-shelf or fabricated — are the most straightforward fixing solution and work well in kitchen and utility spaces where a robust, honest look is appropriate. For reclaimed timber shelves in an industrial or rustic interior, visible steel brackets are entirely at home. The bracket must be rated for the load it will carry — a heavy kitchen shelf loaded with cast iron pans requires a very different bracket than a decorative shelf holding framed photographs.
Floating Shelf Brackets
Concealed floating shelf brackets — lengths of steel rod or bar that project horizontally from the wall and are inserted into holes drilled into the back of the shelf board — give the cleanest visual result. The shelf appears to emerge from the wall without any visible support. This approach works best with timber at least 40mm thick, as the board needs to have enough depth to accommodate the bracket rods without breaking through the face.
The limitation is structural — concealed brackets of the standard domestic type are not appropriate for very heavy loads. Kitchen shelves carrying significant weight should use solid steel bracket rods at least 12mm in diameter, fixed into wall anchors rated for the load, and with enough rods per shelf to distribute the weight safely.
Pipe and Fitting Brackets
Black iron pipe used as a shelf bracket — a floor flange fixed to the wall, a section of pipe as the bracket arm, and a cap or return fitting at the outer end — has become a popular choice in kitchen and utility settings. It suits the aesthetic of reclaimed timber particularly well, is extremely strong, and can be assembled without specialist tools or fabrication. The pipe diameter (typically 3/4 inch or 1 inch) and the length of the bracket arm need to be proportionate to the depth and weight of the shelf it carries.
Wooden Peg or Batten Support
For alcove shelving — where the shelf is supported along two sides by the alcove walls, or along the back by a fixed batten — a simple wooden batten screwed to the wall and the shelf set on top of it gives a very clean, traditional result. This approach requires the alcove walls to be structurally sound and the batten to be fixed into solid material. It is the least visible of all the fixing methods and the most traditional.
Sourcing the Timber
We found our kitchen shelf boards at a reclamation yard about forty minutes from home — two planks of reclaimed pitch pine from a Victorian school, each just over 2m long, 260mm wide, and 45mm thick. The colour was a deep, warm amber with the characteristic resinous quality of old pitch pine, and the surface carried the grain and minor marks of a board that had served as a school floor for the best part of a century.
What to Look For
For shelving timber specifically, flatness matters more than for some other applications. A shelf board that is bowed or twisted along its length will either sit unevenly against the wall or create a visible curve in the shelf line — neither is acceptable. Lay any candidate board on a flat surface in the yard and look along its length from one end. A slight bow along the length can be corrected by fixing; a twist or wind across the width is much harder to manage.
Check thickness consistency. A board that varies significantly in thickness from one end to the other will produce a shelf with a visible taper — fine as a design choice if it is deliberate, a problem if it is not. Run a tape across the thickness at several points along the board before committing.
Check for hidden fixings as always — reclaimed floorboards in particular can have nails driven at intervals that may not be visible at the surface. A magnet sweep before purchase or at least before machining is essential.
Species for Shelving
Pitch Pine
Our choice, and one we would make again. Pitch pine is hard, dense, and resinous — it resists moisture, takes heavy loads without bowing, and develops a colour and surface quality with age that improves rather than deteriorates. Victorian mill and school floors are the most common source. It is one of the most practical choices for kitchen shelving where the timber will be in contact with water, cooking oils, and steam.
Oak
Reclaimed oak is the premium choice for living room and library shelving where appearance is the primary consideration. Its hardness makes it an excellent structural material, and the grain and colour of old oak at eye level is simply very beautiful. Wide oak boards in good condition are not always easy to find, and they are not cheap, but for a single run of feature shelving the investment is usually worth it.
Pine
Reclaimed pine — from old floorboards, joinery, or roof timbers — is the most affordable option and still a significant step up from new commercial softwood shelving. It is softer than oak or pitch pine and more susceptible to denting and scratching, but properly finished and used in appropriate applications it gives excellent results. For a bedroom, home office, or less heavily used living room shelf, reclaimed pine is a very reasonable choice.
Scaffold Board
Old scaffold boards occupy a particular niche — they are thick, substantial, and carry the marks of real use in a way that even other reclaimed timber rarely matches. The rough sawn face, paint splashes, nail holes, and general battering that a board acquires on a construction site gives scaffold board shelving an irreducibly industrial character. It suits kitchens, utility rooms, workshops, and spaces with an honest, unrefined aesthetic. It is also typically very affordable.
The Build Process
Step One: Preparing the Timber
The two pitch pine planks went through the same preparation process we use for all reclaimed timber projects. Full magnet sweep, nail extraction, wire brushing of the face to remove loose material, and a moisture content check. The readings were 9% and 10% respectively — well within the acceptable range for indoor use — after two weeks of acclimatisation in the kitchen.
We ran both boards through the thicknesser to bring them to a consistent 38mm — losing a few millimetres from the original 45mm but achieving flat, consistent faces that would sit flush against brackets and look right at eye level. The long edges were shot on the jointer to straighten them, and the ends were cross-cut square.
Sanding for kitchen shelves in pitch pine needs thought. We did not want to remove the surface character entirely, but we did need a face that was clean, safe to have food adjacent to, and able to take finish properly. We used a belt sander with 80-grit paper to level the face, followed by an orbital sander through 120 and 180. The surface retained its character — the grain, the resin pockets, the occasional mark — but was smooth to the touch and ready for finishing.
Step Two: Finishing Before Installation
Finishing shelves before they go on the wall is significantly easier than finishing them in place, and produces a better result. All four faces of each board — top, underside, both long edges — received two coats of a hardwax oil before installation.
For kitchen shelves, we used Osmo TopOil in a clear satin finish — a product specifically designed for surfaces that come into contact with food, water, and oils. It is fully cured and food-safe once dry, handles the moisture of a kitchen environment well, and can be refreshed with a maintenance coat when needed. The pitch pine responded immediately and dramatically — the amber and red tones deepened, the grain sharpened, and the resin pockets took on a warm, glassy quality.
The ends of the boards — which would be visible at each side of the run — were given the same treatment, with particular attention to the end grain, which is more absorbent and needs more thorough saturation to achieve consistent colour.
Step Three: Wall Preparation
This is the stage that determines whether the project succeeds or fails, and it takes as long as everything else combined.
We started by mapping the wall. A battery-powered stud and cable detector passed along the full length of the fixing area identified two vertical timber studs in the stud wall at one end, a horizontal pipe chase mid-wall, and the reassuring solidity of a masonry section at the other end. Marking these positions on the wall with light pencil lines before drilling anything is not optional — the consequences of putting a drill bit through a water pipe or a live cable range from expensive to dangerous.
The bracket positions were marked at the planned shelf heights, checked against the stud/masonry map, and confirmed level with a long spirit level. For a run of shelving at 180cm, two brackets per shelf is the minimum; three brackets — one at each end and one in the centre — are better and were what we used.
Fixings into the masonry section used 8mm plugs and 60mm screws. Fixings into the timber studs used 75mm structural screws driven directly without plugs. The pipe brackets — 3/4-inch iron pipe with floor flanges and cap ends — were bolted through the flanges using the fixing points described above.
Step Four: Cutting to Final Length
With the brackets in place and the wall positions confirmed, we cut each shelf board to its final length — trimming a small amount from the end that would butt against the wall to achieve a tight, clean fit against the plaster. This is best done in situ, with the board held at height and the precise cut position marked directly rather than measured and transferred.
Step Five: Installation
The boards were set onto the brackets, checked level across their full length with a spirit level, and fixed. Our pipe bracket design did not require screwing through the top face of the shelf — the shelf sat on the cap of each bracket and was held by gravity and its own weight. We added two small countersunk screws through the underside of each board into the bracket arm as a security measure, driven from below so they are invisible from any normal viewing position.
The underside of each board was checked once more for level — in a kitchen where you are looking at the shelves from below the worktop height as much as from in front, a shelf that is not level is visible immediately.
The Finished Result
The two shelves have been on the kitchen wall for over a year. They carry a full complement of everyday kitchen items — oils, jars, a mortar and pestle, a few frequently used dry goods — and they have not moved, bowed, or given any cause for concern. The pitch pine surface is unchanged, its colour rich and warm, the grain as clear as the day we oiled it.
More than that, they are the element of the kitchen that feels most permanent. The worktops, the units, the appliances — all of these have the quality of things that could be replaced. The reclaimed pitch pine shelves look as though they have always been there, and as though they will still be there long after everything else has changed.
Frequently Asked Questions
How much weight can reclaimed wood shelves hold?
The load capacity of a reclaimed timber shelf depends on three factors: the thickness and species of the timber, the span between brackets, and the strength and fixing quality of the brackets themselves. As a general guide, a 40mm reclaimed hardwood shelf spanning 90cm between brackets on heavy-duty steel brackets fixed into masonry will comfortably support 30–50kg of distributed load. A thinner board over a longer span will support significantly less. For shelves intended to carry heavy items — cast iron cookware, large book collections, significant stored weight — always err on the side of a shorter span and more brackets rather than fewer. If in doubt, consult a structural engineer or a qualified builder for a specific assessment.
Do I need to seal reclaimed wood shelves in a kitchen?
Yes. Raw or unfinished timber in a kitchen will absorb cooking oils, moisture, and food residue in a way that is both unhygienic and damaging to the wood. A proper finish — ideally a food-safe hardwax oil or penetrating oil designed for kitchen surfaces — seals the timber against liquid ingress, makes the surface cleanable, and protects the wood from the steam and humidity cycles that a kitchen environment produces. Apply at least two coats before installation, paying particular attention to end grain, and maintain the surface with a periodic refresh coat as recommended by the product manufacturer.
What is the maximum length a reclaimed wood shelf can span without support?
As a working rule for 40mm-thick reclaimed hardwood, the maximum unsupported span is approximately 90–100cm. For 30mm hardwood, reduce this to around 70cm. Softwood at the same thicknesses should be treated more conservatively — around 75cm for 40mm pine, 60cm for 30mm pine. These are practical guidelines for normally loaded domestic shelving, not engineering specifications. Longer spans carrying light, evenly distributed loads may be acceptable; shorter spans carrying concentrated heavy loads may not be. If the intended use involves significant weight in a specific location — a heavy piece of equipment sitting in the centre of the span, for example — add a bracket or increase the board thickness.
Can I use reclaimed wood shelves in a bathroom?
Yes, with appropriate timber selection and finishing. Bathrooms present a more challenging moisture environment than kitchens — the combination of steam, condensation, and the occasional direct water contact from splashing requires timber that has been properly sealed on all faces and edges. Dense hardwoods — oak, pitch pine, teak — handle the bathroom environment better than softer species.
Finish with a minimum of three coats of a penetrating hardwax oil on all faces before installation, and add a maintenance coat once a year. Avoid locating raw timber shelves directly above a bath or shower where they will be in regular contact with water. A reclaimed timber shelf above a basin on an exterior wall — where the surface will see occasional splashing but not sustained moisture — is an entirely reasonable application with appropriate finishing.
How do I prevent reclaimed wood shelves from bowing over time?
Bowing in a shelf over time is caused by one of three things: a span that is too long for the load, timber that was not fully dry before installation, or finishing on the top face only while leaving the underside raw. Address all three and bowing is rarely a problem with dense reclaimed hardwood. Keep spans within the limits described above for the timber thickness you are using. Check moisture content before installation — 8–12% is the target for shelving in a centrally heated home. Finish the underside of the shelf with the same number of coats as the top face, as uneven moisture absorption between faces causes differential movement that results in cupping or bowing.
Conclusion
Reclaimed wood shelves are the project we recommend to anyone who is new to working with salvaged timber and wants to see what the material can do. The quantities involved are small enough to make sourcing straightforward, the tools required are basic, and the result — a run of aged, characterful timber sitting on the wall at eye level — has an impact on a room that far exceeds the effort the project demands.
Get the preparation right, fix into solid material, choose brackets proportionate to the load, and finish properly on all faces. Everything else follows from those fundamentals.
For the full picture on sourcing, identifying quality, preparing timber, and choosing finishes across all types of salvaged timber project, our complete guide to reclaimed wood covers every stage of the process from yard to finished result.