Table of Contents
Key Takeaways
- Reclaimed wood beams are one of the most dramatic and transformative architectural features you can introduce to a home — exposed overhead, they change the entire character of a room.
- Maintenance is straightforward but must be consistent — beams that are ignored for years are harder and more expensive to restore than beams given regular, simple attention.
- Cleaning, treating for pests, monitoring for moisture, and periodic re-oiling or re-waxing are the four pillars of a good beam maintenance routine.
- The finish type applied during installation determines the maintenance products and methods appropriate going forward — knowing what is on your beams before you treat them prevents costly mistakes.
- Structural beams and decorative beams have different maintenance priorities — structural timbers require periodic professional assessment in addition to surface care.
- With proper maintenance, reclaimed wood beams will look better in twenty years than they do today — the timber continues to develop character and depth that no new material can replicate.
The Feature That Changes a Room Permanently
There are interventions in a home that feel significant while they are happening and then settle quietly into the background. And then there are the ones that change a room so completely that it becomes impossible to remember what it looked like before.
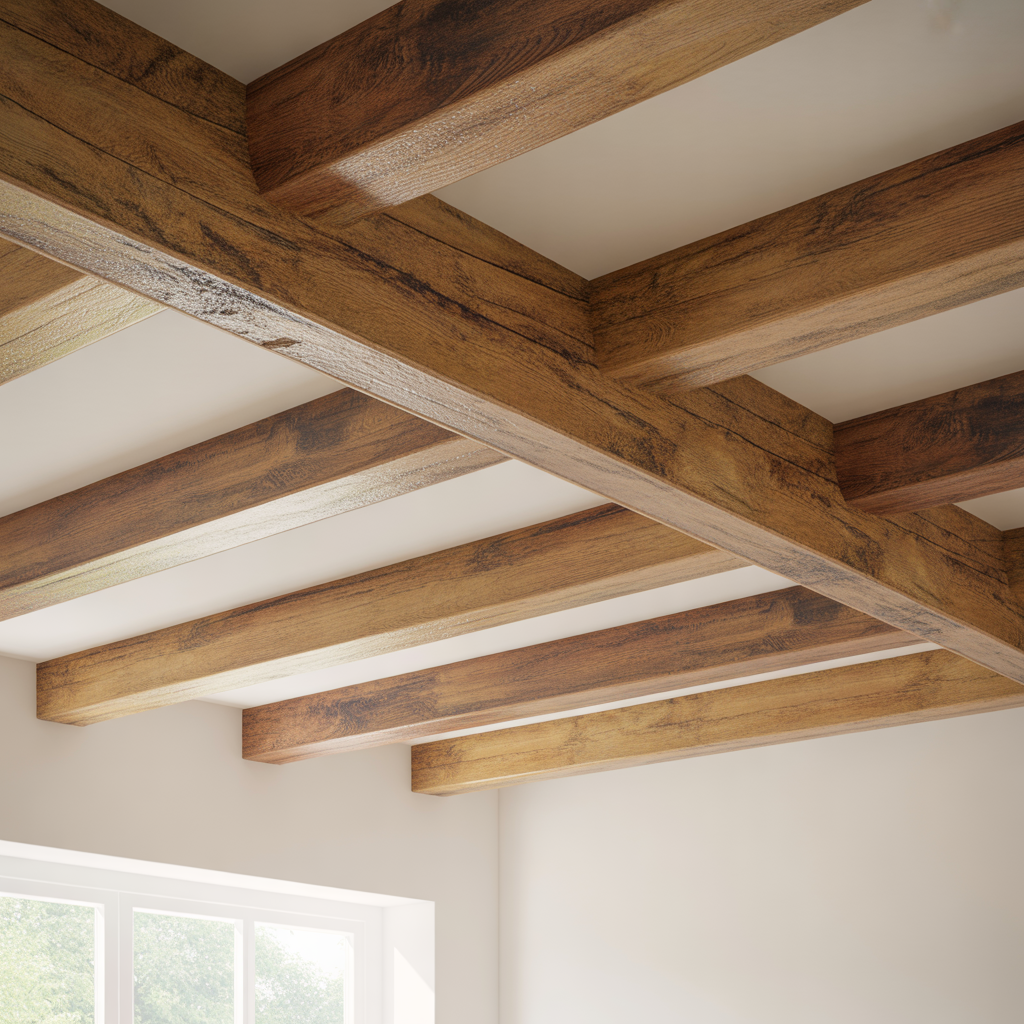
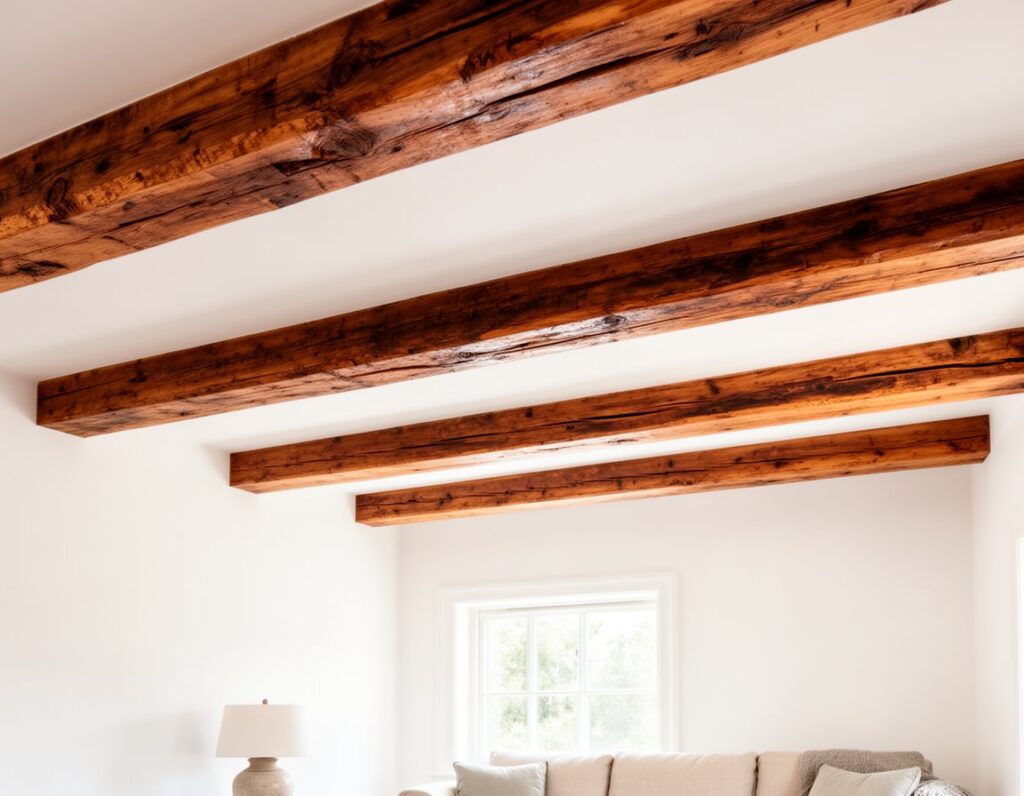
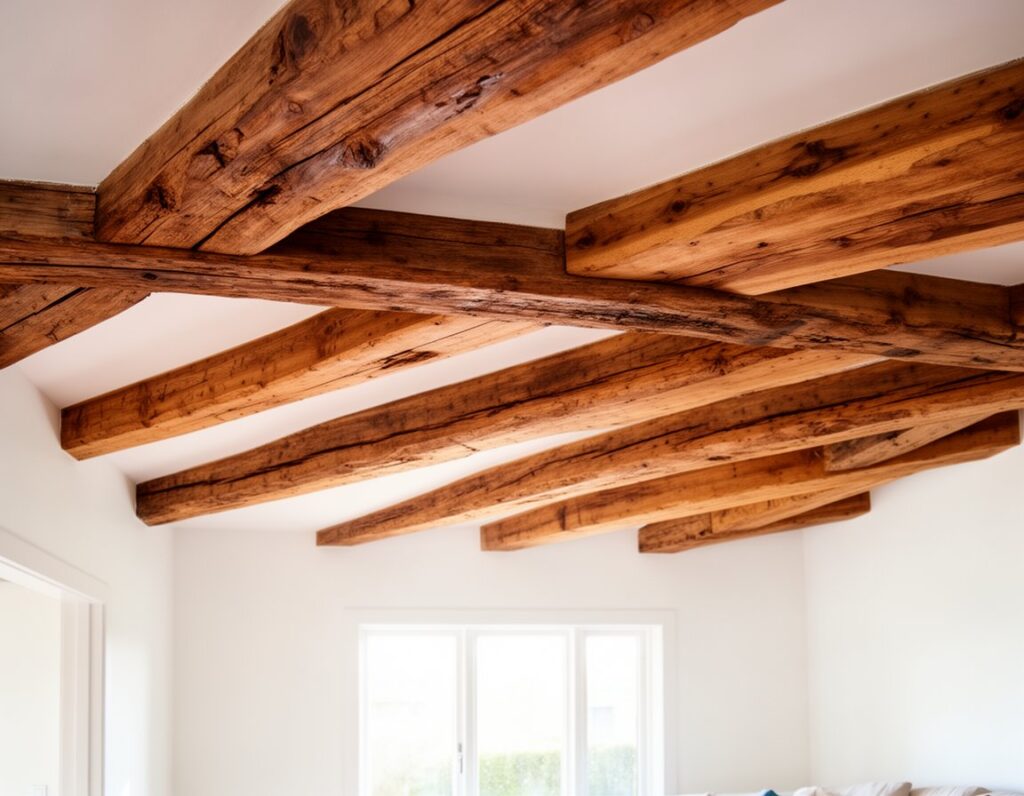
Reclaimed wood beams belong firmly in the second category. Exposed overhead in a kitchen, a sitting room, a bedroom, or a hallway, a well-placed beam — or a run of beams — shifts the entire atmosphere of the space. The room feels older, more considered, more grounded. The ceiling, which most people never think about, becomes one of the most interesting surfaces in the house.
The appeal of reclaimed wood for beams specifically is the surface character that only genuinely old timber carries. An adzed oak beam from a demolished barn, a hand-hewn pine beam from a Victorian farmhouse, a massive elm section from a mill — these are objects with presence. They do not look like design choices. They look like architecture.
But beams, installed and admired, are also beams that accumulate dust, occasionally face pest pressure, respond to the humidity cycles of the rooms they live in, and need periodic attention to stay at their best. This guide covers everything you need to know about maintaining reclaimed wood beams — keeping them clean, treating the surface, monitoring their condition, and ensuring they continue to look stunning for decades to come.
Understanding What You Have
Before any maintenance programme can be established, it is worth understanding the specific characteristics of the beams in your home. Not all reclaimed beams are the same, and the maintenance approach that suits one type may not suit another.
Species
The timber species of your beams determines their density, their response to moisture, their susceptibility to pest damage, and the products that work best on their surface. Oak is by far the most common species in UK reclaimed beams — it is dense, hard, and naturally resistant to many common timber pests. Pine and pitch pine are softer and more susceptible to woodworm but respond well to oil treatments. Elm is rarer and tends to be even denser than oak. Knowing your species is the starting point for everything else.
If you are not certain of the species, a timber specialist or reclamation company can usually identify it from a photograph or a small sample. The grain pattern, colour, and texture of the timber all provide strong identification clues.
Original Treatment History
Beams salvaged from old buildings may carry the legacy of previous treatments — limewash, creosote, lead-based paint, preservatives of various kinds. Some of these affect the maintenance options available to you. Beams with residual creosote, for example, will repel most water-based treatments and should only be treated with solvent-based products compatible with the existing surface. Beams that have been painted over at some point in their history may need the paint removed before any further treatment is applied.
If your beams came from a specialist reclamation yard, ask them for whatever provenance information they hold. A reputable yard will know at minimum where the timber came from and whether any obvious treatments were present.
Structural vs Decorative
A structural beam — one that is load-bearing, carrying the weight of a floor or roof above — has maintenance priorities that go beyond surface appearance. In addition to keeping the surface clean and treated, structural beams need periodic inspection for any signs of deterioration that could affect their load-bearing capacity. Decorative beams — timbers fixed to a ceiling or wall for visual effect, carrying no structural load — can be maintained on appearance alone.
If you are not certain whether your beams are structural or decorative, a structural engineer or a qualified surveyor can advise. Never assume that a beam is decorative simply because it looks as though it could be.
Routine Cleaning and Dust Removal
The most basic element of beam maintenance is also the one most consistently neglected. Beams accumulate dust, cobwebs, and airborne grease — particularly in kitchens — and a beam that has not been cleaned in several years will have a significantly duller and less characterful surface than one given regular attention.
Regular Dusting
Beams should be dusted every two to three months as part of normal cleaning. A long-handled soft brush — the kind sold for cleaning Venetian blinds, or a wide decorating brush with soft bristles — is the most practical tool for reaching beams without a ladder. Work along the length of each beam, paying attention to the top faces where dust accumulates most heavily, and to any carved or adzed surface texture where dust lodges in the recesses.
A vacuum cleaner with a brush attachment is more effective than a dry brush for removing settled dust without redistributing it — particularly useful in a room where the beam surface is at low enough height to reach with a vacuum hose.
Removing Cobwebs
Cobwebs on beams are inevitable, particularly in rooms with high ceilings or limited air circulation. A long-handled cobweb brush — or a microfibre duster on an extension pole — removes them without the need for a ladder. Do not use a damp cloth to remove cobwebs from raw or oiled timber; moisture on a surface that has not been fully sealed can raise the grain and cause staining.
Cleaning Cooking Grease in Kitchens
Kitchen beams present a specific challenge. Cooking grease carried in steam rises to the highest point in the room and deposits itself on horizontal surfaces — including the top faces and sides of exposed beams. Over time this creates a tacky, dull surface that traps dust and deadens the natural colour of the timber.
Annual cleaning of kitchen beams with a diluted solution of sugar soap — approximately one tablespoon to a litre of warm water — applied with a lint-free cloth and worked into the surface in the direction of the grain, then wiped back with a clean damp cloth and dried immediately, will remove grease deposits without damaging the underlying finish. Allow the surface to dry completely — at least twenty-four hours in a ventilated room — before any oil or wax treatment is applied.
Do not use washing-up liquid or household multi-surface sprays on reclaimed timber beams. The surfactants in these products can strip surface treatments and leave residues that affect subsequent finishing.
Monitoring Condition
Routine cleaning is also an opportunity to inspect the condition of your beams. Catching problems early — pest activity, moisture ingress, surface deterioration — is significantly cheaper and less disruptive than addressing them once they have developed.
Checking for Woodworm
Woodworm — the larval stage of several species of wood-boring beetle — is one of the most common concerns with reclaimed timber. The signs of active infestation are small circular exit holes (typically 1–2mm in diameter) and fine, powdery bore dust that collects below the holes or on horizontal surfaces nearby.
It is important to distinguish between active and historic infestation. Exit holes without fresh bore dust, in timber that has been dry and well-maintained for some time, are almost always historical — the larvae that made them emerged years or decades ago and are long gone. Old reclaimed beams commonly carry historical woodworm holes, and these are part of the character of the timber rather than a cause for concern.
Fresh bore dust beneath exit holes, or holes that were not present at the last inspection, indicate active infestation and should be treated promptly. Purpose-made woodworm treatment fluid — applied by brush or spray into the exit holes and across the affected surface — is effective against most common species of wood-boring beetle. For a significant active infestation in structural timber, professional treatment by a specialist timber company is advisable.
Monitoring for Moisture
Reclaimed timber beams are generally more stable than new timber because they have already been through decades of movement and are largely acclimatised to the normal range of indoor humidity. However, moisture problems — a roof leak above the ceiling, condensation from a poorly ventilated bathroom, rising damp in a solid-walled building — can introduce moisture to beams in amounts that cause swelling, surface deterioration, or in extreme cases rot.
Check beams periodically with a moisture meter — a quick pass along the length of each beam twice a year takes only minutes and will identify any localised increase in moisture content before it becomes a serious problem. A reading of more than 20% in an indoor beam warrants investigation of the moisture source before any surface treatment is applied.
Dark staining along the length or at a specific point on a beam is often an indication of historic or current moisture ingress. If the staining is dry and stable, it is historical and cosmetic. If the timber is soft or spongy to the touch at the stained area, there is active moisture damage and the source must be identified and resolved before any surface treatment is considered.
Looking for Surface Deterioration
The surface finish on your beams — whether oil, wax, or a penetrating treatment — provides the primary protection against moisture absorption and surface soiling. Over time, this finish depletes and the timber becomes more vulnerable. Signs that the finish needs refreshing include a dull, flat surface appearance where the grain has lost its definition, a surface that absorbs water rather than beading it, and patches of uneven colour where the finish has worn through more quickly in heavily exposed areas.
Maintaining the Surface Finish
The maintenance treatment appropriate for your beams depends on the finish that was applied during installation. Applying the wrong product over an existing finish can cause adhesion problems, cloudiness, or incompatible chemical reactions.
Identifying Your Existing Finish
If you installed the beams yourself, you will know what finish was applied. If you moved into a property with existing beams and the finish history is unknown, a simple test will help identify the type: apply a small drop of water to an inconspicuous area of the beam surface. If the water beads and sits on the surface, the finish is intact and likely a penetrating oil or wax. If the water is absorbed quickly, the finish has depleted and the timber is essentially raw. If the water sits temporarily then absorbs slowly and leaves a slight white mark, there may be a surface lacquer or varnish present.
Oiled Beams
Beams finished with a penetrating hardwax oil — Osmo Polyx, Rubio Monocoat, Treatex, or comparable products — should be maintained with the same or a compatible product. The maintenance process is straightforward:
Clean the surface thoroughly and allow to dry completely. Lightly abrade the surface with fine grey or white abrasive pad — not sandpaper — to open the grain and provide a key for the new coat. Apply the maintenance oil with a lint-free cloth or flat brush, working in the direction of the grain. Wipe back any excess oil that has not been absorbed within thirty minutes. Allow to cure — typically twenty-four to forty-eight hours — before the surface is back in contact with dust or cleaning products.
The frequency of re-oiling depends on the exposure of the beams. In a kitchen where the timber is exposed to cooking steam and grease, annual re-oiling is appropriate. In a living room or bedroom where exposure is minimal, every two to three years is usually sufficient.
Waxed Beams
Beams finished with a furniture wax — beeswax, carnauba wax, or a proprietary timber wax — require a slightly different maintenance approach. Wax sits on the surface of the timber rather than penetrating it, and over time it accumulates dust and grime within the wax layer. Periodic removal of the old wax before reapplication gives a cleaner, more consistent result than simply building up additional layers.
Remove old wax with white spirit applied on a lint-free cloth, working in the direction of the grain. This lifts the old wax layer and any embedded dirt with it. Allow the surface to dry and off-gas fully — at least four hours, preferably overnight — before applying fresh wax. New wax is applied in a thin, even coat with a lint-free cloth or a natural bristle brush, left to harden for thirty minutes, then buffed to a soft sheen with a clean cloth.
Raw or Lightly Treated Beams
Some reclaimed timber beams are left entirely raw — no finish at all — particularly where the aesthetic goal is the most natural, unworked appearance. Raw beams in a stable indoor environment are not necessarily a problem, but they are more susceptible to surface soiling and moisture absorption than finished timber, and they can be harder to clean when marks occur.
A first application of a penetrating oil to a previously raw beam is straightforward and does not require the beam to be removed or sanded. Clean the surface thoroughly, allow to dry completely, and apply oil as described above. The beam will absorb significantly more product on the first application than it will on subsequent maintenance coats. Two or three initial coats applied a week apart, rather than a single heavy application, gives more consistent penetration and a better result.
Painted or Limewashed Beams
Beams that have been painted or limewashed — whether as part of a decorating scheme or as a legacy of their previous life — present different maintenance requirements. A well-adhered painted finish simply needs keeping clean and retouching where the paint has chipped or worn. Limewash can be refreshed periodically with a diluted application of the same product, which renews the chalky, mineral quality of the surface without stripping it back.
If a painted or limewashed beam is to be returned to a natural timber surface, the paint must be stripped before any oil or wax treatment is applied. Heat stripping, chemical stripping, or mechanical sanding are the three options — the right choice depends on the type of paint, the extent of the coverage, and the surface character of the timber beneath. If the paint is old enough to potentially contain lead, professional assessment and safe removal procedures are essential before any stripping work begins.
Dealing With Specific Problems
Grey Surface Weathering
Beams installed directly from a yard without thorough cleaning may develop a grey, flat surface over time as oxidation continues. This can also occur on beams that have been in place for years and have not been finished or maintained. The remedy is straightforward: a light abrade with a fine abrasive pad or 180-grit paper along the grain removes the surface oxidation and reveals the warmer colour beneath. Follow immediately with a coat of penetrating oil while the surface is open and receptive.
Splits and Checks
Longitudinal splits — known as checks — are extremely common in large-section reclaimed beams and are a normal characteristic of old timber rather than a defect. Checks develop as the timber dries and the outer layers shrink faster than the inner core. In a decorative beam they are cosmetic; in a structural beam they should be monitored but rarely affect load-bearing capacity unless they are very deep or numerous.
Checks that are collecting dust and grime can be cleaned with a soft brush and a vacuum. They do not need to be filled — doing so typically looks worse than leaving them, and filler will not move with the timber through seasonal expansion and contraction, leading to cracking and fallout. Apply finishing oil into the checks as part of the normal maintenance cycle, which keeps them from becoming a water trap.
Dark Staining and Water Marks
Dark staining from historic moisture is a common feature of reclaimed beams and is generally part of the character of the timber. Fresh water marks — from a roof leak that has since been resolved, for example — can sometimes be lightened by careful application of oxalic acid solution, which bleaches timber staining. This is a more involved process than routine maintenance and is worth attempting only once the moisture source has been fully resolved and the timber has dried back to normal moisture content.
Surface Mould
Mould on a beam surface indicates a sustained moisture problem — beams in a properly ventilated, normally heated indoor space should not develop mould. Address the moisture source first. Once resolved and the timber dry, surface mould can be treated with a diluted solution of white vinegar — applied with a cloth, left for an hour, then wiped back and the surface allowed to dry fully. A penetrating timber treatment with a fungicidal additive can then be applied to protect against recurrence.
Frequently Asked Questions
How often should reclaimed wood beams be re-oiled or re-waxed?
The frequency depends on the exposure of the beams and the type of finish applied. As a general guide, kitchen beams — exposed to cooking steam and airborne grease — benefit from re-oiling once a year. Beams in living rooms, bedrooms, or hallways can typically go two to three years between maintenance treatments in normal conditions. The most reliable indicator is the behaviour of the surface itself: if water no longer beads on the surface, if the grain looks flat and dull, or if the timber has taken on a thirsty, open appearance, a maintenance coat is due regardless of when the last one was applied.
Can I change the colour of my reclaimed wood beams without removing them?
Yes, within limits. A penetrating oil with a colour tone — medium oak, dark oak, or similar — applied to a clean, lightly abraded surface will shift the colour of the beam in the direction of the chosen tone. Multiple coats will deepen the effect. Lightening a beam that has been darkened with a tinted oil is more difficult and may require light sanding before a paler product is applied. Going from a dark finish to a very light natural finish typically requires significant sanding or stripping. Applying a limewash over a raw or lightly oiled surface is an effective way to achieve a lighter, chalky grey-white appearance without heavy mechanical work.
Are reclaimed wood beams safe if they were previously treated with creosote?
Beams that have been heavily treated with creosote — railway sleepers are the most common example — are not appropriate for indoor use in living spaces. Creosote continues to off-gas at room temperature, has a persistent and penetrating odour, and contains compounds that are hazardous to health with prolonged indoor exposure. Beams from agricultural buildings, domestic structures, and most commercial buildings are not typically creosote-treated and are safe for indoor use. If you are uncertain about the treatment history of beams already in situ, a specialist timber company can carry out a surface analysis. Beams with historic surface residues that are fully encapsulated under a sealed finish present less risk than those with exposed or partially exposed treated surfaces.
Should I fill the gaps and checks in my reclaimed wood beams?
No, in almost all cases. Checks — longitudinal splits along the grain — are a natural characteristic of old timber and part of the character of the beam. Filling them with a flexible filler may seem like an improvement, but the filler will not move with the timber as it expands and contracts seasonally, and will crack and fall out within a season or two, leaving a worse appearance than the unfilled check.
Deep checks that are collecting significant amounts of debris can be cleaned periodically with a brush and vacuum, and treated with a maintenance oil application to prevent them becoming a water trap. The same philosophy applies to nail holes, knots, and other surface marks — they are features of genuinely reclaimed timber and should be embraced rather than concealed.
My beams have gone very dark over the years — can I lighten them?
Darkening of reclaimed timber beams over time is normal and generally represents the development of the timber rather than deterioration. The darkening comes from a combination of oxidation, the gradual cure of any oil or wax treatments, and the accumulation of airborne material in the surface.
If the darkening is unwanted, gentle cleaning with a diluted sugar soap solution will remove the surface accumulation and often reveal a warmer, lighter tone beneath. Significant lightening of a deeply darkened beam surface requires sanding or stripping of the existing finish, which is a more involved process and easier to approach by working in sections along the beam length. A light application of a pale or natural penetrating oil after the surface has been opened up will preserve the lighter colour rather than allowing rapid re-darkening.
Conclusion
Reclaimed wood beams are not a feature that asks a great deal of you in return for what they give. A consistent cleaning routine, periodic inspection for signs of pest activity or moisture, and a maintenance coat of the appropriate finish when the surface tells you it needs one — that is the full extent of the commitment they require.
In return, they offer something that no manufactured product can provide: a surface that genuinely improves with time, that carries the marks of its history and its current life in a way that deepens its character rather than diminishing it. An oak beam that looked spectacular the day it was installed will look more spectacular in ten years, and better still in twenty, if it is given the simple, consistent care that solid old timber deserves.
For a full understanding of the material — what makes good reclaimed timber, how to identify quality, and what the preparation process involves — our complete guide to reclaimed wood covers every aspect of working with salvaged timber from source to finished result.