
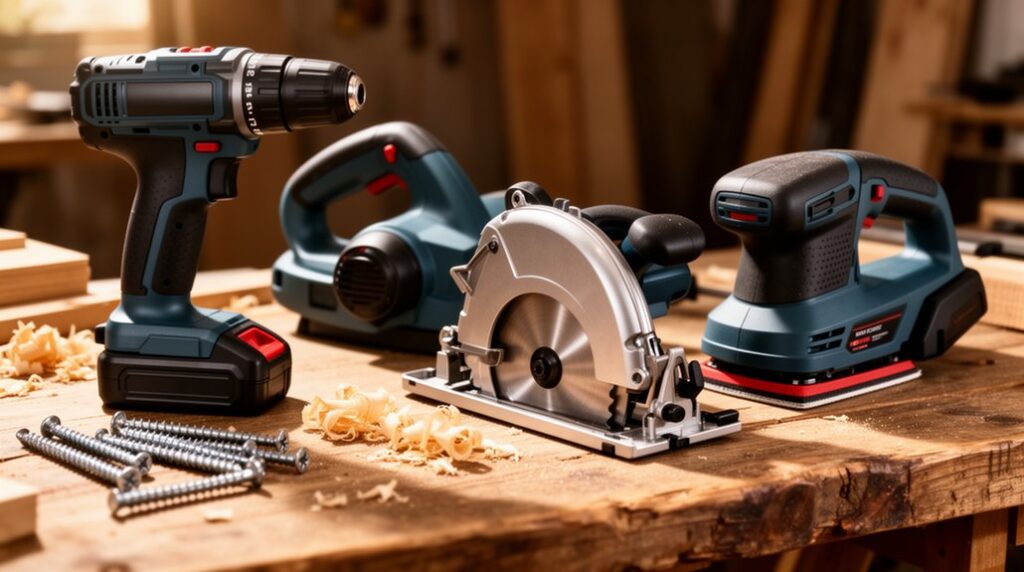
Start with a cordless drill/driver on one battery platform, plus two batteries, and you’ll handle most fixes fast. Add an impact driver when screws bog down in dense lumber, and an oscillating multi-tool for flush cuts in tight trim or drywall spots. A compact circular saw with a straightedge guide makes clean, straight breakdown cuts, while a random orbital sander levels patches without swirls. Pair it all with a shop vac for dust control—next you’ll see how to choose and use each tool right.
Key Takeaways
- Start with a cordless drill/driver for most drilling and screwdriving tasks; choose a 12V–20V model with clutch and two speeds.
- Add an impact driver for stubborn fasteners in dense lumber; use impact-rated bits and proper speed to prevent stripping.
- Use a compact circular saw for fast, straight cuts; pair it with a straightedge guide and set blade depth just past the material.
- Keep an oscillating multi-tool for tight-space cuts, trimming jambs, and small repairs; switch blades for cutting, scraping, or sanding.
- Get a random orbital sander for smooth, paint-ready patches; use 120→180/220 grits and connect a shop vacuum for dust control.
Starter Power Tools: What to Buy First

If you’re starting from scratch, buy power tools in the order you’ll actually use them: begin with a cordless drill/driver kit, add an impact driver for fasteners, then pick up a circular saw for straight cuts.
Choose one battery platform so packs and chargers interchange, and buy at least two batteries to avoid downtime.
For the saw, match blade size to your likely projects and add a straightedge guide for repeatable cuts.
Prioritize power tool safety: wear eye and hearing protection, clamp workpieces, and keep cords and hands out of cut lines.
Follow maintenance tips: blow dust from vents, inspect cords and batteries, keep blades sharp, and store tools dry.
Add a small shop vacuum next.
Cordless Drill/Driver Power Tool for Most Fixes
Because it handles drilling holes and driving screws with one compact tool, a cordless drill/driver belongs at the center of your basic kit for most home fixes. Choose a 12V–20V model with a two-speed gearbox, a keyless chuck, and a clutch you can dial down for softwood and drywall to prevent stripped screws.
Keep a small set of drill bits, driver bits, and countersinks together so you don’t hunt mid-job. For straight holes, start slow, keep the tool square, and let the bit cut without forcing it.
Stay consistent with battery maintenance: avoid deep drains, top off after use, and store packs at moderate charge.
Prioritize tool storage too—use a case or wall hook to protect the chuck and keep accessories organized always.
Impact Driver Power Tool: When a Drill Struggles
A cordless drill/driver covers most drilling and fastening, but dense lumber, long structural screws, and stubborn fasteners can make it bog down or cam out. When that happens, reach for an Impact driver power tool; it delivers rapid rotational impacts that keep the bit engaged and drive fasteners with less effort.
Use it for deck screws, ledger bolts with hex adapters, and long cabinet screws where consistent torque matters. Pair it with quality impact-rated bits and hold the tool straight to prevent stripping. Dial in speed if your model offers it, and start slow to avoid snapping small screws.
For woodworking projects, predrill when needed, then let the impacts finish. In furniture assembly, it saves wrists and seats fasteners cleanly.
Oscillating Multi-Tool for Tight-Space Repairs
When you can’t fit a saw or sander where the repair sits, you reach for an oscillating multi-tool and control the cut with a short, precise stroke.
You’ll use a flush-cut blade to trim casing, shims, or drywall patches tight to a surface without overcutting in confined areas.
Swap to a sanding pad or scraper to clean up corners, remove adhesive, and prep edges where straight tools can’t reach.
Flush Cuts In Confined Areas
Ever needed a perfectly flush cut where a saw simply won’t fit? An oscillating multi-tool solves that fast, letting you trim jambs, baseboards, or protruding nails tight to a surface without overcutting.
Start with smart blade selection: use a bi-metal blade for metal fasteners, a Japanese-tooth blade for clean wood cuts, and a carbide-grit blade for grout or fiberglass.
Mark your cut line, then set the tool’s shoe or blade flat against the reference surface to control depth. Let the oscillation do the work—use light pressure and short passes for precision trimming.
For confined areas, angle the head slightly and keep cords clear. Stop often to check flushness before you go too far.
Sanding And Scraping Corners
Although corners and inside edges love to trap old paint, caulk, and filler, an oscillating multi-tool with a triangular sanding pad or rigid scraper cleans them up fast without chewing up the surrounding surface. Start with a scraper blade to lift brittle paint and dried caulk, keeping the tool flat so you don’t gouge drywall or trim.
Switch to a 60–80 grit pad to level ridges, then finish with 120–150 for paint-ready smoothness. Use light pressure and let the oscillation do the work; forcing it rounds sharp corners.
For corner filling, vacuum dust, then apply filler in thin passes so it bonds. Your best sanding techniques include short strokes into the corner and frequent grit changes to prevent clogging.
Compact Circular Saw Power Tool for Straight Cuts

When you switch to a compact circular saw for straight cuts, you’ll get cleaner results by matching the blade’s tooth count and material rating to the stock you’re cutting.
You’ll also set up a reliable cut guide—straightedge or track—by measuring the saw’s base offset, clamping securely, and confirming the line with a test pass.
To cut safely and accurately, you’ll support the work, set blade depth just past the material, keep the cord and hands clear, and let the saw reach full speed before you feed steadily through the cut.
Choosing The Right Blade
How do you get clean, straight cuts from a compact circular saw without burning the wood or fighting tearout? You start by matching the blade to the material and the saw.
Check blade compatibility first: correct diameter, arbor size, and max RPM rating. Then choose tooth count and grind. Use 24T for fast framing cuts, 40–60T for plywood and trim, and a thin-kerf option if your saw bogs down.
For cleaner edges, pick an ATB or high-ATB carbide blade; for melamine or laminate, look for a triple-chip grind. Don’t ignore blade durability—quality carbide stays sharp longer and tracks straighter.
Replace blades that wobble, lose teeth, or scorch consistently.
Setting Up Cut Guides
Where most compact circular saw cuts go wrong isn’t the saw—it’s the lack of a reliable guide. Start by marking your cut line with a sharp pencil, then confirm it with precision measurement: hook your tape from the same reference edge and verify both ends match your plan.
Next, measure your saw’s base-to-blade offset and write that number on the saw for quick setup. Clamp a straightedge, level, or factory track parallel to the cut line at that offset.
Check for bow by sighting down the guide and re-clamp if it shifts. Support the workpiece so it can’t sag; add a sacrificial board if needed.
Put on safety equipment before you start positioning clamps and cords.
Safe Straight-Cut Techniques
With your cut guide locked in and the work supported, the next step is controlling the saw so it tracks straight without binding or kicking back. Put on safety glasses, set blade depth just below the material, and keep the shoe flat to the surface.
Start the motor before the blade touches, then ease in at a steady feed rate—don’t force it. Stand slightly to the side of the cut line so you’re not in the kickback path, and keep both hands on the saw. Watch the guide edge, not the blade, and let the saw’s weight do the work.
For clean results, use consistent cutting techniques, pause if you hear pitch change, and back out with the blade spinning.
Jigsaw Power Tool for Curves and Cutouts
Although many cuts call for straight lines and rigid guides, a jigsaw earns its place when you need tight curves, interior cutouts, and quick shape changes in plywood, MDF, or thin hardwood.
You’ll handle curved cuts and intricate patterns by choosing the right blade: fine-tooth for clean edges, coarse for fast roughing, and scrolling blades for tight radii.
Mark your line, clamp the work, and start with the shoe flat so the blade doesn’t chatter.
For interior openings, drill a starter hole, drop the blade in, then follow your layout without forcing the tool.
Let the saw do the work; pushing bends blades and wanders.
Use the orbital setting for speed, and turn it off for cleaner control.
Random Orbital Sander Power Tool for Smooth Patches
When you need a patch to disappear instead of telegraphing through paint or stain, reach for a random orbital sander to level filler, blend edges, and erase swirl marks.
Start with 120-grit to knock down high spots, then switch to 180 or 220 for Patch smoothing on drywall compound, wood putty, or epoxy filler. Keep the pad flat and keep it moving; if you tip the tool, you’ll dish the repair and expose the edge.
Feather 6–12 inches past the patch so the surface reads as one plane under raking light.
For orbital sanding on soft wood, use light pressure and let the motor do the work to avoid pigtails.
Finish by hand-sanding tight corners with matching grit.
Shop Vacuum for Dust-Controlled Home Repairs
Random orbital sanding leaves a surface that looks flat, but it also throws fine dust that’ll settle into wet paint, cling to trim, and get ground into floors. A shop vacuum gives you fast dust containment and keeps cleanup from becoming another project.
Use a fine-dust bag plus a HEPA filter so you don’t exhaust powder back into the room. Connect the hose to your sander’s port or a universal adapter, and keep the hose runs short to protect vacuum efficiency.
Set the vacuum on auto-start if it supports tool activation, then sand with steady passes while the vacuum pulls continuously.
Afterward, vacuum edges, baseboards, and vents, then wipe with a damp microfiber for a paint-ready surface.
Frequently Asked Questions
How Do I Choose Battery Voltage: 12V or 20V for Home Repairs?
Choose 12V if you mostly handle light repairs—tight spaces, small fasteners, and quick fixes—because you’ll get a smaller, lighter tool.
Choose 20V if you’ll drill larger holes, drive long screws, or cut tougher materials, since you’ll get more torque and runtime.
Compare Battery life by amp-hours, not just voltage, and check Charging times so you’re not waiting mid-job.
Consider your tool lineup.
What Safety Gear Is Essential When Using Power Tools Indoors?
Suit up safely: indoors, you’ll need Protective eyewear and Ear protection first, since flying chips and harsh noise happen fast.
You should add a dust mask or respirator for sanding and cutting, plus snug gloves for grip, not bulk.
Wear closed-toe shoes and tie back hair.
Use knee pads when working low.
Keep a bright headlamp, and don’t skip a fire extinguisher nearby.
How Often Should I Replace Bits, Blades, and Sanding Discs?
Replace bits, blades, and sanding discs as soon as performance drops, not on a fixed calendar.
Watch Bit durability: swap drill/driver bits when tips round, cam-out increases, or you see heat discoloration.
Track blade lifespan: replace saw blades when cuts burn, wander, or require extra force.
Change sanding discs when they clog, glaze, or stop removing material quickly.
Inspect after each job and keep spares on hand.
Can These Tools Be Safely Used on Plaster, Masonry, or Tile?
Yes, you can safely use them on plaster, masonry, or tile if you follow proper tool compatibility and surface preparation techniques.
You’ll choose masonry-rated bits/blades, carbide grit, and the correct drill/hammer setting; don’t force the cut.
You’ll mask dust, score plaster, and stabilize loose areas.
On tile, you’ll tape the glaze, start slow, and keep it cool with water to prevent cracking.
What Maintenance Keeps Power Tools Working Longer and Running Cooler?
You keep power tools running longer and cooler by cleaning vents after every job, blowing out dust, and wiping housings dry. You’ll inspect cords, brushes, and bearings, then replace worn parts before they drag the motor.
You keep bits and blades sharp, lubricate moving pivots, and tighten fasteners.
For cordless tools, you protect Battery lifespan by avoiding deep discharge and heat.
Prioritize Tool storage in a dry, padded case always.
Conclusion
When you stock these simple power tools, you’ll handle most home repairs faster and cleaner. Start with a cordless drill/driver, add an impact driver for stubborn fasteners, and keep an oscillating multi-tool ready for tight cuts and flush trims. Use a compact circular saw for straight work, a jigsaw for curves, and a random orbital sander for smooth patches. Pair everything with a shop vacuum—because even in the age of telegrams, dust still ruins a finish.

