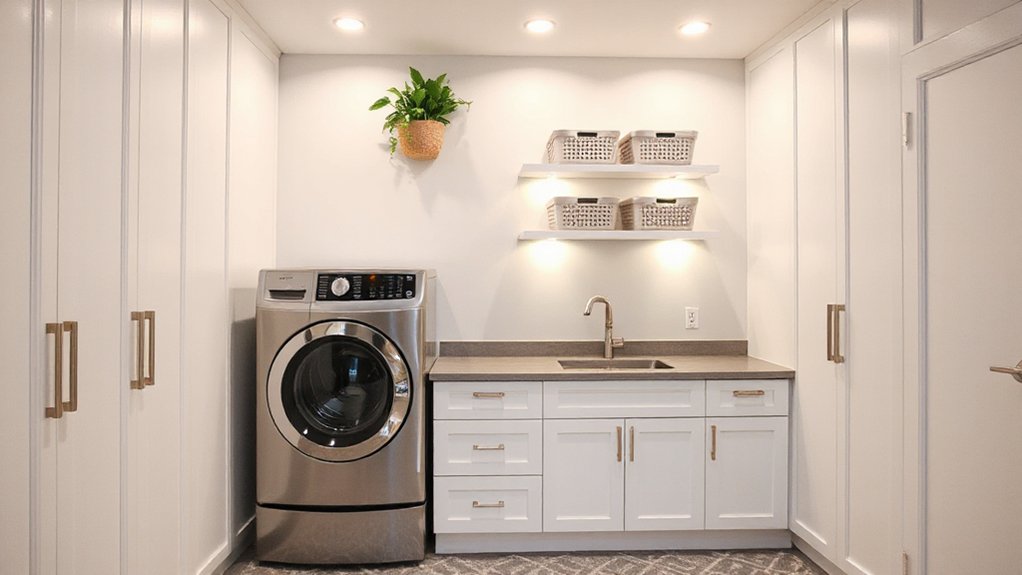
Start by zoning your utility room around key tasks—laundry, cleaning supplies, and a quick drop-zone—so doors and appliances stay clear. Refresh solid cabinets with paint, simple slab or Shaker fronts, and modern pulls, then add a durable countertop like laminate or butcher block. Brighten work areas with high-lumen LED lighting and under-shelf strips. Use wall rails, labeled bins, and slim rolling carts to hide clutter fast. Keep going for more layout and finish upgrades.
Key Takeaways
- Zone the room by tasks, keep clear appliance/door clearances, and store daily items at eye level for a streamlined workflow.
- Refresh cabinetry with paint or flat-panel doors, add matching toe-kicks, and swap to modern pulls in consistent finishes.
- Upgrade surfaces with a durable countertop, simple backsplash, and a tiled landing pad near the entry to handle mud and moisture.
- Maximize hidden storage using wall cabinets, pull-out baskets, labeled stackable bins, door-back hooks, and a slim rolling cart between machines.
- Brighten and simplify with high-lumen LED lighting, water-resistant flooring, neutral paint, and minimal accessories to keep counters clear.
Plan a Modern Utility Room Layout
Before you buy a single cabinet, map your utility room around the tasks you do most—laundry, cleaning supply storage, and quick drop-zone sorting—so every step feels intentional and nothing blocks the washer, dryer, or door swing.
Measure clearances, then sketch zones: washer/dryer wall, a folding surface, and a hamper parking spot.
Keep frequently used detergents at eye level on open shelves, and store bulk refills low to avoid lifting overhead.
Add a wall rail with hooks near the entry for bags, leashes, and wet coats.
Plan a dedicated outlet and counter space for an iron or steamer.
If you’ve got Vintage appliances, let them anchor the layout, then balance them with clean lines and neutral paint so traditional decor feels updated, not cluttered.
Update Utility Room Cabinets and Hardware
Where can you get the biggest visual upgrade for the least money in a utility room? Update your cabinets and hardware first. If boxes are solid, keep them and change the look with paint, new doors, or open shelving. Choose cabinet styles that read modern: flat-panel, slim Shaker, or simple slab fronts. Use a durable, washable enamel and add matching toe-kick trim for a built-in feel.
Next, swap dated knobs and pulls. Pick consistent hardware finishes—matte black for contrast, brushed nickel for a clean classic, or champagne bronze for warmth. Measure existing hole spacing so you reuse holes and avoid patching.
Add soft-close hinges if yours slam; they’re cheap and make everything feel upgraded. Finish with shelf liners to protect interiors and simplify cleanup.
Choose Modern Utility Room Countertops
How do you make a utility room feel finished without blowing your budget? Start with a durable, modern countertop that ties your updated cabinets together. Compare countertop materials based on how you actually use the space: laminate stays affordable and resists stains, butcher block warms up the room but needs sealing, and quartz costs more yet shrugs off chemicals and moisture.
If you want a concrete look for less, consider porcelain slab or compact laminate in matte finishes. Measure carefully, plan for a deep utility sink cutout, and choose a simple eased edge to reduce fabrication costs.
For countertop installation, DIY works for laminate and butcher block; hire pros for stone to avoid cracks. Match caulk and backsplash height for a cleaner line.
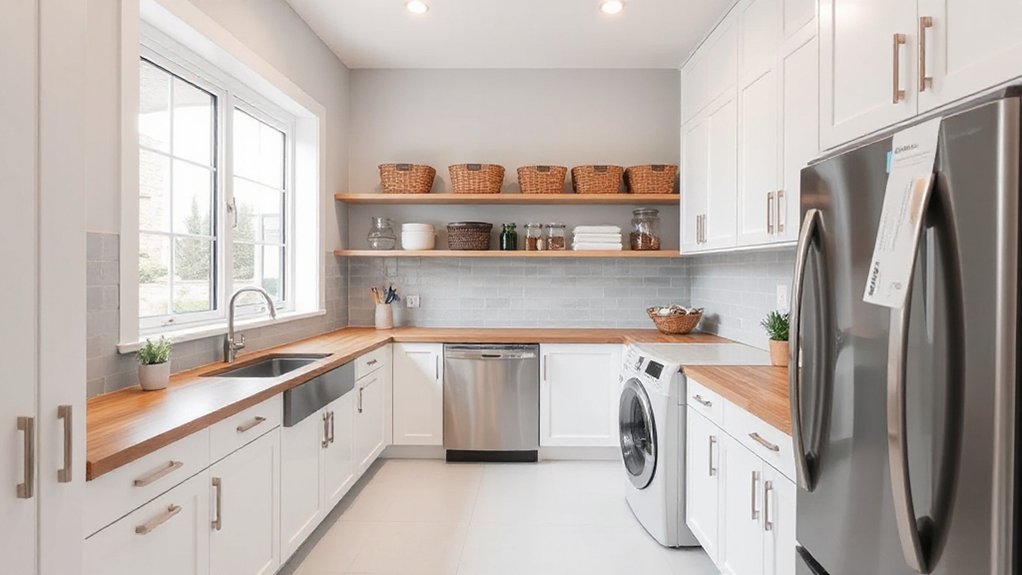
Add Smart Utility Room Storage Solutions
Once you’ve chosen a hardworking countertop, make the rest of the utility room earn its keep with storage that controls clutter and keeps supplies within reach.
Start with Smart storage: wall-mounted cabinets to clear floor space, a tall broom closet, and open shelves for daily detergents. Add pull-out wire baskets for rags and cleaning sprays so nothing gets lost in the back.
Use labeled, stackable bins sized to your shelves to avoid wasted vertical space. Install a slim rolling cart between machines for stain removers and dryer sheets.
For tech integration, mount a charging shelf for handheld vacs and rechargeable lint rollers, and add a small tablet holder for chore checklists.
Finish with door-back hooks and a fold-down drying rack to save money and square footage.
Upgrade Utility Room Lighting for Brighter Tasks
Although a utility room doesn’t need fancy fixtures, it does need bright, even light so you can spot stains, read detergent labels, and sort colors without eye strain. Swap old bulbs for energy efficient bulbs in the 4000K–5000K range for crisp, neutral light, and aim for high-lumen output rather than higher wattage.
If your ceiling fixture is dim or shadowy, install an inexpensive LED flush mount or shop-light style strip to spread light wall to wall. Then add task lighting options where you work: an under-shelf LED bar above the folding surface, a motion-sensor puck light inside cabinets, or a clamp lamp over the sink.
Use dimmers only with compatible LEDs, and keep switches near the entry for quick control.
Pick Durable, Modern Utility Room Flooring
In a utility room, your floor has to handle spills, wet boots, and detergent drips, so start with water-resistant options like luxury vinyl plank, porcelain tile, or sealed concrete.
You’ll also save time and money by choosing low-maintenance modern materials that don’t need constant sealing or special cleaners.
Pick a finish with good slip resistance and a wear layer that matches your traffic, so it lasts without a pricey redo.
Water-Resistant Flooring Options
Where does a utility room floor take the most abuse—right by the washer, sink, and any exterior door? Plan for splashes, leaks, and tracked-in water by choosing a water-resistant surface and building in protection underneath.
Sheet vinyl is budget-friendly and handles puddles well when you heat-weld or tightly seam edges. Luxury vinyl tile/plank costs more but gives a cleaner, modern look and better dent resistance; pair it with Waterproof barriers at seams and at the wall base.
Porcelain tile shrugs off water and adds value, but you’ll pay more for prep and grout. Select textured, slip resistant surfaces for safety.
If you’re on concrete, consider a two-part epoxy coating; it seals moisture and tolerates detergents and grit.
Low-Maintenance Modern Materials
Since utility rooms see daily traffic, grit, detergent drips, and the occasional leak, you’ll save time and money by choosing modern flooring that cleans fast and won’t swell, stain, or dent.
Luxury vinyl tile (LVT) gives you waterproof seams, soft underfoot comfort, and easy plank replacement if a corner gets gouged.
Porcelain tile costs more upfront, but it shrugs off heat, bleach, and washer vibration; use a darker grout to hide lint.
For a tighter budget, sealed concrete with Eco friendly finishes resists chemicals and won’t trap odors; add anti-slip additive for safety.
Keep thresholds low and choose cove base to block mop water.
Pair durable floors with vintage inspired fixtures for character without extra upkeep.
Refresh a Utility Room With Paint and Tile
You can refresh your utility room fast with a modern paint color that brightens the space and hides scuffs, like a soft gray, warm white, or muted blue.
For extra durability where it counts, add tile accents as a backsplash behind the sink or a wainscot strip near splash zones instead of tiling the whole room.
You’ll get a cleaner, updated look while keeping material and labor costs under control.
Choose Modern Paint Colors
Even if you’re keeping the tile and fixtures as-is, modern paint can make a utility room feel cleaner, brighter, and more intentional on a modest budget. Start with color psychology: soft whites and warm greiges boost brightness without feeling sterile, while muted blue-green calms visual clutter and hides scuffs.
If the room lacks windows, pick a high-LRV shade to bounce light; in sunny rooms, choose a slightly deeper neutral to avoid glare.
Choose the right paint finish for abuse and easy cleaning. Use satin or semi-gloss on walls near sinks, hampers, and pet stations; they wipe down fast and resist moisture. Use a scrubbable matte on upper walls for a modern look with fewer roller marks.
Buy one quality primer and fewer gallons overall.
Add Durable Tile Accents
Fresh paint sets a clean baseline, but durable tile accents handle the real wear and tear in a utility room. Add tile where water, grit, and detergent splash most: behind the sink, around the washer hookups, and at the floor entry. Choose porcelain or ceramic for low cost, easy cleanup, and strong stain resistance.
On the floor, prioritize a Slip resistant surface with a matte finish and smaller grout lines that hide scuffs. If you’re keeping existing flooring, install a tiled “landing pad” near the door to catch mud and snow.
For a modern look without a full re-tile, run a simple subway-tile wainscot and cap it with a thin Decorative mosaic band. Use premixed thinset for small areas, seal grout, and buy extra tiles for future repairs.
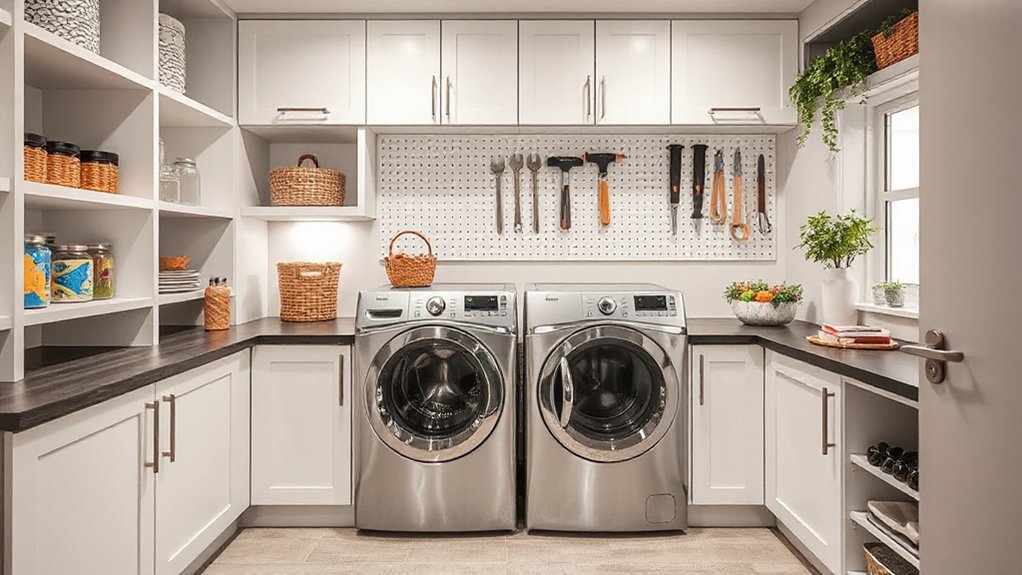
Hide Clutter With Modern Utility Room Organization
When a utility room doubles as a drop zone, clutter piles up fast unless every item has a designated, easy-to-reach home. Start by zoning: laundry, tools, pet gear, and incoming bags.
Add a wall-mounted rail with hooks for backpacks and brooms, then label two or three stackable bins per zone so you can reset the room in minutes.
Use a closed cabinet or curtain-front shelf to hide detergents and odd-shaped supplies without spending on custom built-ins.
Install a slim rolling cart for frequently used items and park it between appliances.
Keep cleaning routines simple by storing refill bottles and cloths together.
Improve energy efficiency by keeping dryer vent tools and lint bin handy.
Finish Your Utility Room With Sleek Accessories
After you’ve nailed down storage zones, sleek accessories give your utility room a finished look without adding visual clutter or blowing the budget. Stick to minimalist decor: one neutral palette, simple shapes, and a repeatable finish like matte black or brushed nickel.
Swap mismatched hooks for a slim rail, and add labeled, stackable bins so you can grab supplies fast. Choose a low-profile clock, a small tray for pocket items, and a wall-mounted drying rack that folds flat.
Upgrade lighting with an LED flush mount and under-shelf strips to cut shadows without rewiring. Finish with a washable runner for traction and noise control. Keep surfaces clear, and you’ll maintain that modern feel daily.
Frequently Asked Questions
Do I Need Permits to Remodel My Utility Room?
Yes, you might need permits to remodel your utility room, depending on what you change. If you move plumbing, add circuits, relocate a water heater, or alter walls, permit requirements usually kick in and inspections confirm safety regulations.
Painting, shelving, and swapping like-for-like fixtures often don’t.
Call your local building department with a scope list; it’s cheaper than fines, rework, or insurance headaches later.
What’s the Average Cost to Modernize a Utility Room?
You’ll usually spend $3,000–$12,000 to modernize a utility room—think of it like giving your home’s “engine room” a tune-up.
Keep costs down by reusing plumbing runs and focusing on appliance placement, so hookups stay put.
Budget $500–$2,000 for flooring and paint.
$1,000–$4,000 for cabinets and storage solutions.
And $1,500–$5,000 for appliance upgrades and electrical.
Labor often runs 40–60%.
How Long Does a Typical Utility Room Update Take?
You can finish a typical utility room update in 2–7 days, depending on scope and scheduling.
If you’re only adding paint, shelving, and basic storage solutions, plan 1–3 days.
If you’re upgrading flooring, lighting, and appliances for better energy efficiency, expect 3–7 days, plus 1–2 weeks lead time for materials.
To stay cost-conscious, batch tasks, reuse cabinets, and avoid moving plumbing.
Can I DIY the Remodel, or Should I Hire a Contractor?
You can DIY the remodel if it’s mostly cosmetic, but you should hire a contractor for plumbing, electrical, or structural changes.
You’ll save money painting, installing shelving, and upgrading Storage solutions like wall cabinets or pegboards.
Swap in Decorative lighting if you’re comfortable replacing fixtures; otherwise pay an electrician.
Set a firm budget, price materials first, and schedule inspections where required.
If timelines or permits stress you, outsource.
How Do I Reduce Noise and Vibration From Laundry Appliances?
You’ll cut noise and vibration by improving appliance placement and using smart soundproofing techniques.
Level the washer, tighten feet, and add anti-vibration pads or a rubber mat.
Pull machines slightly off walls to prevent rattles.
Replace worn shock absorbers and balance loads.
Add a solid-core door, weatherstripping, and door sweep.
Insulate the shared wall and seal gaps with acoustical caulk.
Use braided hoses to reduce banging.
Conclusion
Once you’ve reworked the layout, updated cabinets and hardware, and chosen durable counters and flooring, your utility room starts pulling its weight. Add smart storage, brighter task lighting, and a fresh coat of paint or easy-clean tile to keep maintenance low and daily chores faster. Tuck clutter behind labeled bins and closed shelving, then finish with a few sleek accessories. Why settle for chaos when a few budget-friendly upgrades can buy you time?